Skip to content Skip to main navigation Skip to footer

python

python中自动化配置Nginx服务器的反向代理

python中自动化配置Nginx服务器的反向代理是如何来实现的呢?下面的内容将会通过具体的实例来演示python中自动化配置Nginx服务器的反向代理的实现方法及相关技巧:

2015628104630354.png (640×479)

如果可以减少过多的外部隔离的API和简化部署的细节 这会是非常好的。

在以前的文章中,我解释了”一些使用反向代理的好处”。在我目前的项目里,我们已经构建分布式面向服务的架构,也显式提供了一个HTTP API,我们使用反向代理将请求路由通过API路由给单个组件。我们选择了Nginx Web这个优秀的服务器作为我们的反向代理,它快速、可靠且易于配置。我们通过它将多个HTTP的API服务聚合到一个URL空间。举例来说,当你键入:

http://api.example.com/product/pinstripe_suit
它将被路由到:
http://10.0.1.101:8001/product/pinstripe_suit
但当你访问:
http://api.example.com/customer/103474783
它将被路由到:
http://10.0.1.104:8003/customer/103474783

对使用者来言,他们觉得是在使用同一个URL空间(http://api.example.com/blah/blah),但在后端不同的顶级分类的URL被路由到不同的后端服务器。 /prodect/…路由到 10.0.1.101:8001, /customer/…则路由到10.0.1.104:8003。 我们也希望这是自动配置。比如说我想创建一个新的组件来记录的库存水平。相比于扩展现有的组件,我更希望能够写另一个独立的可执行文件或提供服务的HTTP端点,然后自动部署成为我的云计算基础架构中的主机之一,并使Nginx的自动将http ://api.example.com/sock/whatever 路由我新组件。 我们也想进行 后端服务的负载平衡,我们也想部署我们的股票 新API的多个服务实例间的Nginx自动轮询。

我们称每个顶级分类(/stock、/produck、/customer)为一个声明。 A组件上线时通过RabbitMQ发布了一个’AddApiClaim’。此消息有3个字段:’声明’,’IP地址’,’端口地址’。我们有一个’ProxyAutomation’的特殊组件,这个组件接收这些消息并按要求重写Nginx配置项。它使用SSH和SCP登录到nginx服务器,传输各种配置文件,并指示Nginx的重新加载配置。我们使用the excellent SSH.NET库来进行自动化。

Nginx的配置是一个非常好的事情是支持通配符。看一看我们的顶级配置文件:

...
 http {
     include       /etc/nginx/mime.types;
     default_type  application/octet-stream;
     log_format  main  '$remote_addr - $remote_user [$time_local] "$request" '
                       '$status $body_bytes_sent "$http_referer" '
                       '"$http_user_agent" "$http_x_forwarded_for"';
     access_log  /var/log/nginx/access.log  main;
     sendfile        on;
     keepalive_timeout  65;
     include /etc/nginx/conf.d/*.conf;
 } 

如16行所描述, 将conf.d目录的所有.conf引用到此处.

在conf.d文件夹内,有一个文件包含了所有api.example.com的请求配置:

include     /etc/nginx/conf.d/api.example.com.conf.d/upstream.*.conf;
 server {
     listen          80;
     server_name     api.example.com;
     include         /etc/nginx/conf.d/api.example.com.conf.d/location.*.conf;
     location / {
         root    /usr/share/nginx/api.example.com;
         index   index.html index.htm;
     }
 } 

这段配置让 Nginx 侦听来自 80 端口的 api.example.com 的请求。

这里包括两部分。第一个部分是第一行,我将在以后讨论。第7行表述了将子目录”api.example.com.conf.d”中的location.*.conf引用到配置中来。我们代理服务器的自动化组件添加新的组件(AKA API claims)通过引入新的location.*.conf。举个例子,我们的股票组件可能创建一个location.stock.conf配置文件,像这样:

location /stock/ {
     proxy_pass http://stock;
 } 

这只是简单的告诉Nginx将所有api.example.com/stock/…的代理请求转发到’stock’中定义的后端服务器,这些定义存放在’upstream.*.conf’中。代理自动化组件也引入了一个名为upstream.stock.conf文件,它看起来像这样:

upstream stock {
    server 10.0.0.23:8001;
    server 10.0.0.23:8002;
} 

这些配置告诉Nginx将所有到api.example.com/stock/的请求轮询到给定的地址,在这个例子中两个实例在同一台机器(10.0.0.23)上,一个在8001端口,一个在8002端口。

正如股票组件的部署一样,添加新条目可以同样增加到upstream.stock.conf中。同样,当组件卸载时,只要删除对应条目就可以了,当所有组件移除时,将整个文件已就删除。

这种基础架构可以让我们聚合组件的基础设备。我们可以 通过简单地添加新的组件实例来扩展应用程序。作为组件开发人员也不需要做任何代理配置,只需要确保组件发送了添加或删除API声明的消息就可以了。


python中自动化配置Nginx服务器的反向代理就是这样,欢迎大家参考。。。。

Python中for循环控制语句用法

Python中for循环控制语句是如何来使用的呢?下面的内容将会通过具体的实例来演示Python中for循环控制语句的使用方法及相关技巧:

本文实例讲述了Python中for循环控制语句用法。分享给大家供大家参考。具体分析如下:

第一个:求 50 – 100 之间的质数

import math
for i in range(50, 100 + 1):
  for j in range(2, int(math.sqrt(i)) + 1):
    if i % j == 0:
      break
  else:
    print i
 

输出如下:

53
59
61
67
71
73
79
83
89
97
 

第二个:把else的位置与if处于同一缩进。

import math
for i in range(50, 100 + 1):
  for j in range(2, int(math.sqrt(i)) + 1):
    if i % j == 0:
      break
    else:
      print i
 

第三个:在else后加一个break语句。

import math
for i in range(50, 100 + 1):
  for j in range(2, int(math.sqrt(i)) + 1):
    if i % j == 0:
      break
    else:
      print i
      break
 

说明:

for语句是python中的循环控制语句。可用来遍历某一对象,还具有一个附带的可选的else块,主要用于处理for语句中包含的break语句。
如果for循环未被break终止,则执行else块中的语句。
break 在需要时终止for循环
continue 跳过位于其后的语句,开始下一轮循环。

for语句的格式如下:
>>>for <> in <对象集合>:
… if <条件>:
… break
… if <条件>:
… continue
… <其他语句>
…else:
… <>

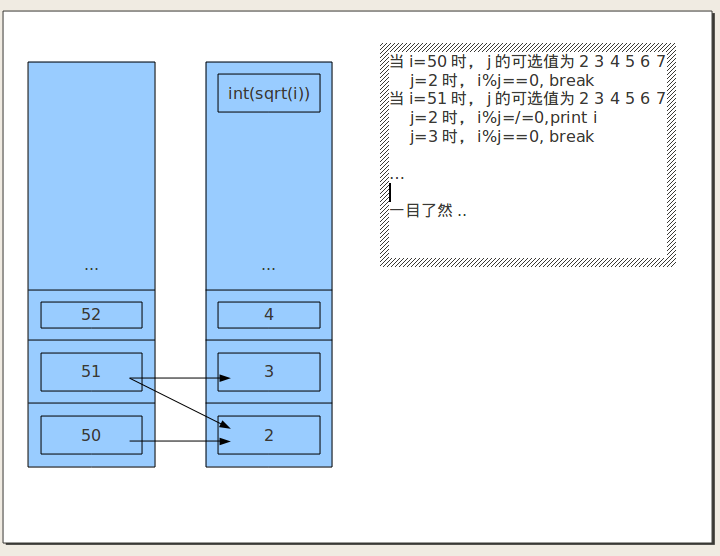
关于第一个程序

在这里,我解释一下为何导入math模块:导入math模块就是为了开方。
如果导入了math模块,然后对 i 进行开方,可以减少运算次数。
求一个数是否质数。只需对它进行这样的运算:
将这个数n,循环与 2 到 这个n的开平方 进行相除
如果这个区间内的所有整数不能整除n,则n为质数。
这样,就节省了运算 ‘大于n的开平方 小于n’ 之间这段运算的时间。
第二,我解释一下那‘+1’:
int(math.sqrt(i)) 输出的是比 i的开平方 小 的最大整数。

比如说:math.sqrt(51) 结果比7大一点,而 int(math.sqrt(51)) 输出的是7
而且在range(m, n)这里,range()函数产生的是一个从 m至n-1的整数列表,因而需要‘+1’,使运算完整。

顺便提一下range()函数。

range([start,] stop [, step])
# start 可选参数,起始数
#stop 终止数,如果 range 只有一个参数x,则产生一个包含 0 至 x-1 的整数列表
#step 可选参数,步长
第二个程序

else那行不对,如果else放在那个地方的话,一旦有某个数遇到不能整除自己的数,就会输出i,直道找到一个整除自己等于0的数。那样就会连续输出这个数。
例如:i = 77,他不是质数,但是也会连续输出5次77,懂不?
只不过,只是自己不明白当else与if位于同一缩进的话,它是怎样运行的。
你解释得很详细,用‘茅塞顿开’来形容一点都不过分。
而且,我必觉得画图是理解循环一个非常好的办法。


Python中for循环控制语句就是这样,欢迎大家参考。。。。

Python实现文件同步服务器的方法

Python实现文件同步服务器是如何来实现的呢?下面的内容将会通过具体的实例来演示Python实现文件同步服务器的实现方法及相关技巧:

本文实例讲述了python实现的文件同步服务器。分享给大家供大家参考。具体实现方法如下:

服务端使用asyncore, 收到文件后保存到本地。

客户端使用pyinotify监视目录的变化 ,把变动的文件发送到服务端。

重点:

1. 使用structs打包发送文件的信息,服务端收到后,根据文件信息来接收客户端传送过来的文件。

2. 客户端使用多线程,pyinotify监视到文件变化,放到队列中,由另外一个线程发送。

上代码:

服务端:

# receive file from client and store them into file use asyncore.#
#/usr/bin/python
#coding: utf-8
import asyncore
import socket
from socket import errno
import logging
import time
import sys
import struct
import os
import fcntl
import threading
from rrd_graph import MakeGraph
try:
  import rrdtool
except (ImportError, ImportWarnning):
  print "Hope this information can help you:"
  print "Can not find pyinotify module in sys path, just run [apt-get install python-rrdtool] in ubuntu."
  sys.exit(1)
class RequestHandler(asyncore.dispatcher):
  def __init__(self, sock, map=None, chunk_size=1024):
    self.logger = logging.getLogger('%s-%s' % (self.__class__.__name__, str(sock.getsockname())))
    self.chunk_size = chunk_size
    asyncore.dispatcher.__init__(self,sock,map)
    self.data_to_write = list()
  def readable(self):
    #self.logger.debug("readable() called.")
    return True
  def writable(self):
    response = (not self.connected) or len(self.data_to_write)
    #self.logger.debug('writable() -> %s data length -> %s' % (response, len(self.data_to_write)))
    return response
  def handle_write(self):
    data = self.data_to_write.pop()
    #self.logger.debug("handle_write()->%s size: %s",data.rstrip('rn'),len(data))
    sent = self.send(data[:self.chunk_size])
    if sent < len(data):
      remaining = data&#91;sent:&#93;
      self.data_to_write.append(remaining)
  def handle_read(self):
    self.writen_size = 0
    nagios_perfdata = '../perfdata'
    head_packet_format = "!LL128s128sL"
    head_packet_size = struct.calcsize(head_packet_format)
    data = self.recv(head_packet_size)
    if not data:
      return
    filepath_len, filename_len, filepath,filename, filesize = struct.unpack(head_packet_format,data)
    filepath = os.path.join(nagios_perfdata, filepath&#91;:filepath_len&#93;)
    filename = filename&#91;:filename_len&#93;
    self.logger.debug("update file: %s" % filepath + '/' + filename)
    try:
      if not os.path.exists(filepath):
        os.makedirs(filepath)
    except OSError:
      pass
    self.fd = open(os.path.join(filepath,filename), 'w')
    #self.fd = open(filename,'w')
    if filesize > self.chunk_size:
      times = filesize / self.chunk_size
      first_part_size = times * self.chunk_size
      second_part_size = filesize % self.chunk_size
      while 1:
        try:
          data = self.recv(self.chunk_size)
          #self.logger.debug("handle_read()->%s size.",len(data))
        except socket.error,e:
          if e.args[0] == errno.EWOULDBLOCK:
            print "EWOULDBLOCK"
            time.sleep(1)
          else:
            #self.logger.debug("Error happend while receive data: %s" % e)
            break
        else:
          self.fd.write(data)
          self.fd.flush()
          self.writen_size += len(data)
          if self.writen_size == first_part_size:
            break
      #receive the packet at last
      while 1:
        try:
          data = self.recv(second_part_size)
          #self.logger.debug("handle_read()->%s size.",len(data))
        except socket.error,e:
          if e.args[0] == errno.EWOULDBLOCK:
            print "EWOULDBLOCK"
            time.sleep(1)
          else:
            #self.logger.debug("Error happend while receive data: %s" % e)
            break
        else:
          self.fd.write(data)
          self.fd.flush()
          self.writen_size += len(data)
          if len(data) == second_part_size:
            break
    elif filesize <= self.chunk_size:
      while 1:
        try:
          data = self.recv(filesize)
          #self.logger.debug("handle_read()->%s size.",len(data))
        except socket.error,e:
          if e.args[0] == errno.EWOULDBLOCK:
            print "EWOULDBLOCK"
            time.sleep(1)
          else:
            #self.logger.debug("Error happend while receive data: %s" % e)
            break
        else:
          self.fd.write(data)
          self.fd.flush()
          self.writen_size += len(data)
          if len(data) == filesize:
            break
    self.logger.debug("File size: %s" % self.writen_size)
class SyncServer(asyncore.dispatcher):
  def __init__(self,host,port):
    asyncore.dispatcher.__init__(self)
    self.debug = True
    self.logger = logging.getLogger(self.__class__.__name__)
    self.create_socket(socket.AF_INET,socket.SOCK_STREAM)
    self.set_reuse_addr()
    self.bind((host,port))
    self.listen(2000)
  def handle_accept(self):
    client_socket = self.accept()
    if client_socket is None:
      pass
    else:
      sock, addr = client_socket
      #self.logger.debug("Incoming connection from %s" % repr(addr))
      handler = RequestHandler(sock=sock)
class RunServer(threading.Thread):
  def __init__(self):
    super(RunServer,self).__init__()
    self.daemon = False
  def run(self):
    server = SyncServer('',9999)
    asyncore.loop(use_poll=True)
def StartServer():
  logging.basicConfig(level=logging.DEBUG,
            format='%(name)s: %(message)s',
            )
  RunServer().start()
  #MakeGraph().start()
if __name__ == '__main__':
  StartServer()
 

客户端:

# monitor path with inotify(python module), and send them to remote server.#
# use sendfile(2) instead of send function in socket, if we have python-sendfile installed.#
import socket
import time
import os
import sys
import struct
import threading
import Queue
try:
   import pyinotify
except (ImportError, ImportWarnning):
   print "Hope this information can help you:"
   print "Can not find pyinotify module in sys path, just run [apt-get install python-pyinotify] in ubuntu."
   sys.exit(1)
try:
   from sendfile import sendfile
except (ImportError,ImportWarnning):
   pass
filetype_filter = [".rrd",".xml"]
def check_filetype(pathname):
   for suffix_name in filetype_filter:
     if pathname[-4:] == suffix_name:
       return True
   try:
     end_string = pathname.rsplit('.')[-1:][0]
     end_int = int(end_string)
   except:
     pass
   else:
     # means pathname endwith digit
     return False
class sync_file(threading.Thread):
   def __init__(self, addr, events_queue):
     super(sync_file,self).__init__()
     self.daemon = False
     self.queue = events_queue
     self.addr = addr
     self.chunk_size = 1024
   def run(self):
     while 1:
       event = self.queue.get()
       if check_filetype(event.pathname):
         print time.asctime(),event.maskname, event.pathname
         filepath = event.path.split('/')[-1:][0]
         filename = event.name
         filesize = os.stat(os.path.join(event.path, filename)).st_size
         sock = socket.socket(socket.AF_INET, socket.SOCK_STREAM)
         filepath_len = len(filepath)
         filename_len = len(filename)
         sock.connect(self.addr)
         offset = 0
         data = struct.pack("!LL128s128sL",filepath_len, filename_len, filepath,filename,filesize)
         fd = open(event.pathname,'rb')
         sock.sendall(data)
         if "sendfile" in sys.modules:
           # print "use sendfile(2)"
           while 1:
             sent = sendfile(sock.fileno(), fd.fileno(), offset, self.chunk_size)
             if sent == 0:
               break
             offset += sent
         else:
           # print "use original send function"
           while 1:
             data = fd.read(self.chunk_size)
             if not data: break
             sock.send(data)
         sock.close()
         fd.close()
class EventHandler(pyinotify.ProcessEvent):
   def __init__(self, events_queue):
     super(EventHandler,self).__init__()
     self.events_queue = events_queue
   def my_init(self):
     pass
   def process_IN_CLOSE_WRITE(self,event):
     self.events_queue.put(event)
   def process_IN_MOVED_TO(self,event):
     self.events_queue.put(event)
def start_notify(path, mask, sync_server):
   events_queue = Queue.Queue()
   sync_thread_pool = list()
   for i in range(500):
     sync_thread_pool.append(sync_file(sync_server, events_queue))
   for i in sync_thread_pool:
     i.start()
   wm = pyinotify.WatchManager()
   notifier = pyinotify.Notifier(wm,EventHandler(events_queue))
   wdd = wm.add_watch(path,mask,rec=True)
   notifier.loop()
def do_notify():
   perfdata_path = '/var/lib/pnp4nagios/perfdata'
   mask = pyinotify.IN_CLOSE_WRITE|pyinotify.IN_MOVED_TO
   sync_server = ('127.0.0.1',9999)
   start_notify(perfdata_path,mask,sync_server)
if __name__ == '__main__':
   do_notify()
 

python监视线程池

#!/usr/bin/python
import threading
import time
class Monitor(threading.Thread):
  def __init__(self, *args,**kwargs):
    super(Monitor,self).__init__()
    self.daemon = False
    self.args = args
    self.kwargs = kwargs
    self.pool_list = []
  def run(self):
    print self.args
    print self.kwargs
    for name,value in self.kwargs.items():
      obj = value[0]
      temp = {}
      temp[name] = obj
      self.pool_list.append(temp)
    while 1:
      print self.pool_list
      for name,value in self.kwargs.items():
        obj = value[0]
        parameters = value[1:]
        died_threads = self.cal_died_thread(self.pool_list,name)
        print "died_threads", died_threads
        if died_threads >0:
          for i in range(died_threads):
            print "start %s thread..." % name
            t = obj[0].__class__(*parameters)
            t.start()
            self.add_to_pool_list(t,name)
        else:
          break
      time.sleep(0.5)
  def cal_died_thread(self,pool_list,name):
    i = 0
    for item in self.pool_list:
      for k,v in item.items():
        if name == k:
          lists = v
    for t in lists:
      if not t.isAlive():
        self.remove_from_pool_list(t)
        i +=1
    return i
  def add_to_pool_list(self,obj,name):
    for item in self.pool_list:
      for k,v in item.items():
        if name == k:
          v.append(obj)
  def remove_from_pool_list(self, obj):
    for item in self.pool_list:
      for k,v in item.items():
        try:
          v.remove(obj)
        except:
          pass
        else:
          return
 

使用方法:

rrds_queue = Queue.Queue()
  make_rrds_pool = []
  for i in range(5):
    make_rrds_pool.append(MakeRrds(rrds_queue))
  for i in make_rrds_pool:
    i.start()
  make_graph_pool = []
  for i in range(5):
    make_graph_pool.append(MakeGraph(rrds_queue))
  for i in make_graph_pool:
    i.start()
  monitor = Monitor(make_rrds_pool=(make_rrds_pool, rrds_queue),
           make_graph_pool=(make_graph_pool, rrds_queue))
  monitor.start()
 

解析:

1. 接受字典参数,value为一个元组,第一个元素是线程池,后面的都是参数。
2. 每0.5秒监视线程池中的线程数量,如果线程死掉了,记录死掉线程的数目,再启动同样数量的线程。
3. 如果没有线程死去,则什么也不做。

从外部调用Django模块

import os
import sys
sys.path.insert(0,'/data/cloud_manage')
from django.core.management import setup_environ
import settings
setup_environ(settings)
from common.monitor import Monitor
from django.db import connection, transaction
 

前提就是,要新建一个django的project,这里我们新建了一个cloud_manage.
这样不仅可以调用django自身的模块,还能调用project本身的东西。


Python实现文件同步服务器就是这样,欢迎大家参考。。。。

Python中字典创建、遍历、添加的用法介绍

Python中字典创建、遍历、添加是如何来使用的呢?下面的内容将会通过具体的实例来演示Python中字典创建、遍历、添加的使用方法及相关技巧:

字段是Python是字典中唯一的键-值类型,是Python中非常重要的数据结构,因其用哈希的方式存储数据,其复杂度为O(1),速度非常快。下面列出字典的常用的用途.
一、字典中常见方法列表

#方法                                  #描述
-------------------------------------------------------------------------------------------------
D.clear()                              #移除D中的所有项
D.copy()                               #返回D的副本
D.fromkeys(seq[,val])                  #返回从seq中获得的键和被设置为val的值的字典。可做类方法调用
D.get(key[,default])                   #如果D[key]存在,将其返回;否则返回给定的默认值None
D.has_key(key)                         #检查D是否有给定键key
D.items()                              #返回表示D项的(键,值)对列表
D.iteritems()                          #从D.items()返回的(键,值)对中返回一个可迭代的对象
D.iterkeys()                           #从D的键中返回一个可迭代对象
D.itervalues()                         #从D的值中返回一个可迭代对象
D.keys()                               #返回D键的列表
D.pop(key[,d])                         #移除并且返回对应给定键key或给定的默认值D的值
D.popitem()                            #从D中移除任意一项,并将其作为(键,值)对返回
D.setdefault(key[,default])            #如果D[key]存在则将其返回;否则返回默认值None
D.update(other)                        #将other中的每一项加入到D中。
D.values()                             #返回D中值的列表
 

二、创建字典的五种方法

方法一: 常规方法

# 如果事先能拼出整个字典,则此方法比较方便
>>> D1 = {'name':'Bob','age':40}
 

方法二: 动态创建

# 如果需要动态地建立字典的一个字段,则此方法比较方便
>>> D2 = {}
>>> D2['name'] = 'Bob'
>>> D2['age']  =  40
>>> D2
{'age': 40, 'name': 'Bob'}
 

方法三: dict–关键字形式

# 代码比较少,但键必须为字符串型。常用于函数赋值
>>> D3 = dict(name='Bob',age=45)
>>> D3
{'age': 45, 'name': 'Bob'}
 

方法四: dict–键值序列

# 如果需要将键值逐步建成序列,则此方式比较有用,常与zip函数一起使用
>>> D4 = dict([('name','Bob'),('age',40)])
>>> D4
{'age': 40, 'name': 'Bob'}
 

>>> D = dict(zip(('name','bob'),('age',40)))
>>> D
{'bob': 40, 'name': 'age'}
 

方法五: dict–fromkeys方法# 如果键的值都相同的话,用这种方式比较好,并可以用fromkeys来初始化

>>> D5 = dict.fromkeys(['A','B'],0)
>>> D5
{'A': 0, 'B': 0}
 

如果键的值没提供的话,默认为None

>>> D3 = dict.fromkeys(['A','B'])
>>> D3
{'A': None, 'B': None}
 

三、字典中键值遍历方法

>>> D = {'x':1, 'y':2, 'z':3}          # 方法一
>>> for key in D:
    print key, '=>', D[key]
y => 2
x => 1
z => 3
>>> for key, value in D.items():       # 方法二
    print key, '=>', value
y => 2
x => 1
z => 3
>>> for key in D.iterkeys():           # 方法三
    print key, '=>', D[key]
y => 2
x => 1
z => 3
>>> for value in D.values():           # 方法四
    print value
2
1
3
>>> for key, value in D.iteritems():   # 方法五
    print key, '=>', value
y => 2
x => 1
z => 3
 

Note:用D.iteritems(), D.iterkeys()的方法要比没有iter的快的多。

四、字典的常用用途之一代替switch

在C/C++/Java语言中,有个很方便的函数switch,比如:

public class test {
    public static void main(String[] args) {
        String s = "C";
        switch (s){
        case "A":
            System.out.println("A");
            break;
        case "B":
            System.out.println("B");
            break;
        case "C":
            System.out.println("C");
            break;
        default:
            System.out.println("D");
        }
    }
}
 

在Python中要实现同样的功能,
方法一,就是用if, else语句来实现,比如:

from __future__ import division
def add(x, y):
    return x + y
def sub(x, y):
    return x - y
def mul(x, y):
    return x * y
def div(x, y):
    return x / y
def operator(x, y, sep='+'):
    if   sep == '+': print add(x, y)
    elif sep == '-': print sub(x, y)
    elif sep == '*': print mul(x, y)
    elif sep == '/': print div(x, y)
    else: print 'Something Wrong'
print __name__
if __name__ == '__main__':
    x = int(raw_input("Enter the 1st number: "))
    y = int(raw_input("Enter the 2nd number: "))
    s = raw_input("Enter operation here(+ - * /): ")
    operator(x, y, s)
 

方法二,用字典来巧妙实现同样的switch的功能,比如:

#coding=gbk
from __future__ import division
x = int(raw_input("Enter the 1st number: "))
y = int(raw_input("Enter the 2nd number: "))
def operator(o):
    dict_oper = {
        '+': lambda x, y: x + y,
        '-': lambda x, y: x - y,
        '*': lambda x, y: x * y,
        '/': lambda x, y: x / y}
    return dict_oper.get(o)(x, y)
if __name__ == '__main__':
    o = raw_input("Enter operation here(+ - * /): ")
    print operator(o)


Python中字典创建、遍历、添加就是这样,欢迎大家参考。。。。

Python中使用pip安装非PyPI官网第三方库的方法

Python中使用pip安装非PyPI官网第三方库的方法是如何来实现的呢?下面的内容将会通过具体的实例来演示Python中使用pip安装非PyPI官网第三方库的方法的实现方法及相关技巧:

在python中安装非自带python模块,有三种方式:

1.easy_install
2.pip
3.下载压缩包(.zip, .tar, .tar.gz)后解压, 进入解压缩的目录后执行python setup.py install命令

本文主要针对pip安装时可能会碰到的一种情况,及解决办法:

假如我要安装pylint模块,该模块非python自带模块,用import肯定不能导入,需要额外安装

>>> import pylint
Traceback (most recent call last):
  File "<stdin>", line 1, in <module>
ImportError: No module named pylint
 

【现象】

执行pip install 命令,报错如下:

D:>pip install pylint --allow-external pylint
Downloading/unpacking pylint
Requirement already satisfied (use --upgrade to upgrade): six in c:python27libsite-packagessix-1
.8.0-py2.7.egg (from pylint)
Downloading/unpacking astroid>=1.3.6 (from pylint)
  Real name of requirement astroid is astroid
  Could not find any downloads that satisfy the requirement astroid>=1.3.6 (from pylint)
  Some insecure and unverifiable files were ignored (use --allow-unverified astroid to allow).
Cleaning up...
No distributions at all found for astroid>=1.3.6 (from pylint)
Storing debug log for failure in C:Usersaaapippip.log
 

【分析】

在Perl中安装新模块,一般可以用PPM图形化工具,也可以用CPAN来安装,比如说: cpan>install Test::Class, 非常方便,不会碰到这种情况,这种情况主要是因为pip版本问题: pip最新的版本(1.5以上的版本), 出于安全的考
虑,pip不允许安装非PyPI的URL,因为该安装文件实际上来自pylint.org,因而导致上面的错误!

NOTE:

1. 可以在官方changelog里面查看更改的信息
2. 可以用pip –version来查看pip的版本信息

C:>pip --version
pip 1.5.6 from C:Python27libsite-packages (python 2.7)
 

【办法】

针对上面的情况,既然这个问题是因为pip版本的原因,可以改用pip低一点的版本
方法一: 用pip 1.4版本,再执行pip install pylint命令来安装
方法二: 执行命令时,加上–allow-all-external, –allow-unverified及依赖包版本(astroid==1.3.6)

pip install pylint --allow-all-external pylint astroid==1.3.6 --allow-unverified pylint
 

NOTE:
1. –allow-all-external # 允许所有外部地址的标签,只有打上该标签pip方可下载外部地址模块
2. –allow-unverified # pip没有办法校验外部模块的有效性,所以必须同时打上该标签
3. astroid==1.3.6 # 依赖包必须要添加上,并赋予其版本号,pip方能从列表下载

方法三: 在当前目录下,新增requirements.txt,内容如下:

# requirements.txt
--allow-all-external pylint
--allow-unverified pylint
pylint
--allow-all-external astroid==1.3.6
 

再执行: pip install -r requirements.txt
【结论】
1. pip这个设计不够友好,使用也很不方便,远不如Perl中的PPM,期待Python中也有这么个工具。
2. 如果碰到这种错,导致不能安装模块的话: 直接下载压缩包安装好了。 >>>下载包地址<<< 3. 执行pip -h命令查看更新pip相关的帮助信息

Usage:
  pip <command> [options]
Commands:
  install                     Install packages.
  uninstall                   Uninstall packages.
  freeze                      Output installed packages in requirements format.
  list                        List installed packages.
  show                        Show information about installed packages.
  search                      Search PyPI for packages.
  wheel                       Build wheels from your requirements.
  zip                         DEPRECATED. Zip individual packages.
  unzip                       DEPRECATED. Unzip individual packages.
  bundle                      DEPRECATED. Create pybundles.
  help                        Show help for commands.
General Options:
  -h, --help                  Show help.
  -v, --verbose               Give more output. Option is additive, and can be used up to 3 times.
  -V, --version               Show version and exit.
  -q, --quiet                 Give less output.
  --log-file <path>           Path to a verbose non-appending log, that only logs failures. This log is active by default at pip.log.
  --log <path>                Path to a verbose appending log. This log is inactive by default.
  --proxy <proxy>             Specify a proxy in the form [user:passwd@]proxy.server:port.
  --timeout <sec>             Set the socket timeout (default 15 seconds).
  --exists-action <action>    Default action when a path already exists: (s)witch, (i)gnore, (w)ipe, (b)ackup.
  --cert <path>               Path to alternate CA bundle.


Python中使用pip安装非PyPI官网第三方库的方法就是这样,欢迎大家参考。。。。

python使用xmlrpc模块实现二进制文件传输的方法

python使用xmlrpc模块实现二进制文件传输的方法是如何来实现的呢?下面的内容将会通过具体的实例来演示python使用xmlrpc模块实现二进制文件传输的方法的实现方法及相关技巧:

本文实例讲述了python基于xmlrpc实现二进制文件传输的方法。分享给大家供大家参考。具体实现方法如下:

服务器端:

from SimpleXMLRPCServer import SimpleXMLRPCServer
import xmlrpclib
def python_logo():
   handle = open("python_logo.jpg",'rb')
   return xmlrpclib.Binary(handle.read())
   handle.close()
server = SimpleXMLRPCServer(("localhost", 8000))
print "Listening on port 8000..."
server.register_function(python_logo, 'python_logo')
server.serve_forever()
 

客户端代码:

import xmlrpclib
proxy = xmlrpclib.ServerProxy("http://localhost:8000/")
handle = open("fetched_python_logo.jpg", "wb")
handle.write(proxy.python_logo().data)
handle.close()


python使用xmlrpc模块实现二进制文件传输的方法就是这样,欢迎大家参考。。。。

python使用xmlrpclib模块实现对百度google的ping功能

python使用xmlrpclib模块实现对百度google的ping功能是如何来实现的呢?下面的内容将会通过具体的实例来演示python使用xmlrpclib模块实现对百度google的ping功能的实现方法及相关技巧:

本文实例讲述了python使用xmlrpclib模块实现对百度google的ping功能。分享给大家供大家参考。具体分析如下:

最近在做SEO的时候,为了让发的外链能够快速的收录,想到了利用ping的功能,google和百度都有相关的ping介绍,有兴趣的朋友可以去看看相关的知识。实现ping功能除了可以用一些开源的博客程序,比如WP,它是可以在后台设置ping地址的,只要设置好以后,你发帖子,就会自动的通知搜索引擎,我的博客已经更新了,而今天我用的方法是不通过WP等带有ping功能的博客,自己用python 在本地去ping 搜索引擎,从而达到快速收录的效果。

import re
urlinfo = '''http://www.cnpythoner.com/post/181.html
url2
url3
'''
def ping(webname,hosturl,linkurl):
  import xmlrpclib
  rpc_server = xmlrpclib.ServerProxy('http://blogsearch.google.com/ping/RPC2 ')
  result = rpc_server.weblogUpdates.extendedPing(webname,hosturl,linkurl)
  print result
  if result.get('flerror', False) == True:
    print 'ping error'
  else:
    print 'ping success'
def get_url(url):
  '''获取标准的url'''
  host_re = re.compile(r'^https&#63;://(.*&#63;)($|/)',
            re.IGNORECASE
          )
  return host_re.search(url).group(0)
info = urlinfo.split('n')
for m in info:
  webname = m.split('.')[1]
  hosturl = get_url(m)
  ping(webname,hosturl,m)
 

如果返回的结果是{‘message’: ‘Thanks for the ping.’, ‘flerror’: False},说明已经ping成功,恭喜你了,呵呵。

这里主要还是python xmlrpclib 的用法。


python使用xmlrpclib模块实现对百度google的ping功能就是这样,欢迎大家参考。。。。

python中如何使用pdb模块调试Python程序

python中使用pdb模块调试Python程序是如何来使用的呢?下面的内容将会通过具体的实例来演示python中使用pdb模块调试Python程序的使用方法及相关技巧:

在Python中,语法错误可以被Python解释器发现,但逻辑上错误或变量使用错误却不容易发现,如果结果没有符合预期,则需要调试,一个很好的调试工具:Python自带的pdb模块。pdb是Python自带的调试模块。使用pdb模块可以为脚本设置断点、单步执行、查看变量值等。

pdb可以用命令行参数的方式启动,也可以使用import 将其导入后再使用。

>>> dir(pdb)
['Pdb', 'Repr', 'Restart', 'TESTCMD',.....,'re', 'run', 'runcall', 'runctx', 'runeval', 'set_trace', 'sys', 'test', 'traceback']
 

常见的pdb函数有以下几个:

【pdb.run()函数】

>>> 该函数主要用于调试语句块
>>> 基本用法如下

>>> help(pdb.run)
Help on function run in module pdb:
run(statement, globals=None, locals=None)
>>>参数含义
 

statement: 要调试的语句块,以字符串的形式表示
globals: 可选参数,设置statement运行的全局环境变量
locals: 可选参数,设置statement运行的局部环境变量
>>>简单示例

>>> import pdb                # 导入调试模块
>>> pdb.run('''''               # 调用run()函数执行一个for循环
for i in range(3):
    i *= 3
    print(i)
    ''')
> <string>(2)<module>()
(Pdb) n                       # (Pdb)为调试命令提示符,表示可输入调试命令
> <string>(3)<module>()
(Pdb) n                       # n(next)表示执行下一行
> <string>(4)<module>()
(Pdb) print(i)                # 打印变量i的值
(Pdb) continue                # 继续运行程序
3
6
 

【pdb.runeval()函数】
>>>该函数主要用于调试表达式
>>>基本用法如下

>>> help(pdb.runeval)
Help on function runeval in module pdb:
runeval(expression, globals=None, locals=None)
 

>>> 参数含义

expression: 要调试的,
globals: 可选参数,设置statement运行的全局环境变量
locals: 可选参数,设置statement运行的局部环境变量

>>> 简单示例

>>> import pdb                  # 导入pdb模块
>>> lst = [1, 2, 3]             # 定义一个列表
>>> pdb.runeval('lst[1]')       # 调用runaval()函数来调试表达式lst[1]
> <string>(1)<module>()
(Pdb) n                         # 进入调试状态,使用n命令,单步执行
--Return--
> <string>(1)<module>()->2
(Pdb) n                         # 单步执行
2                               # 返回表达式的值
>>> pdb.runeval('3 + 5*6/2')    # 使用runaval()函数来调试表达式3+5*6/2
> <string>(1)<module>()->2
(Pdb) n
--Return--
> <string>(1)<module>()->18
(Pdb) n                         # 使用n命令单步执行
18                              # 最后得出表达式的值
 

【pdb.runcall()函数】

>>>该函数主要用于调试函数
>>>基本用法如下

>>> help(pdb.runcall)
Help on function runcall in module pdb:
runcall(*args, **kwds)
 

>>> 参数含义
function: 函数名
args(kwds): 函数的参数
>>> 简单示例

>>> import pdb                           # 导入模块
>>> def sum(*args):                      # 定义函数sum,求所有参数之和
    res = 0
    for arg in args:
        res += arg
    return res
>>> pdb.runcall(sum, 1, 2, 3, 4)         # 使用runcall调试函数sum
> <pyshell#53>(2)sum()
(Pdb) n                                  # 进入调试状态,单步执行
> <pyshell#53>(3)sum()
(Pdb) n                                  # 单步执行
> <pyshell#53>(4)sum()
(Pdb) print(res)                         # 使用print打印res的值
(Pdb) continue                           # 继续执行
10
>>> pdb.runcall(sum, 1, 2, 3, 4, 5, 6)   # 调用runcall调试函数sum,参数不同
> <pyshell#53>(2)sum()
(Pdb) continue                           # 继续执行
21                                       # 函数最后返回结果
 

【pdb.set_trace()函数】

>>>该函数主要用于脚本中设置硬断点
>>>基本用法如下

>>> help(pdb.set_trace)
Help on function set_trace in module pdb:
set_trace()
 

>>>简单示例

# file: test.py
import pdb
pdb.set_trace()
for i in range(5):
    i *= 5
    print(i)
 

运行脚本后显示:

> d:learnpythontest.py(6)<module>()
-> for i in range(5):
(Pdb) list                     # 使用list列出脚本内容
  1     # file: test.py
  2
  3     import pdb
  4
  5     pdb.set_trace()        # 使用set_trace()设置硬断点
  6  ->  for i in range(5):
  7         i *= 5
  8         print(i)
[EOF]                          # 列出脚本内容结束
(Pdb) continue                 # 使用continue继续执行
5
10
15
20
 

【pdb调试命令】
pdb中的调试命令可以完成单步执行、打印变量值、设置断点等功能。pdb主要命令如下

------------------------------------------------------------------------------
# 完整命令                    简写命令                      描述
------------------------------------------------------------------------------
# args                         a                            打印当前函数的参数
# break                        b                            设置断点
# clear                        cl                           清除断点
# condition                    无                           设置条件断点
# continue                     c                            继续运行,直到遇到断点或者脚本结束
# disable                      无                           禁用断点
# enable                       无                           启用断点
# help                          h                           查看pdb帮助
# ignore                       无                           忽略断点
# jump                         j                            跳转到指定行数运行
# list                         l                            列出脚本清单
# next                         n                            执行下条语句,遇到函数不进入其内部
# print                        p                            打印变量值
# quit                         q                            退出pdb
# return                       r                            一致运行到函数返回
# tbreak                       无                           设置临时断点、断点只中断一次
# step                         s                            执行下一条语句,遇到函数进入其内部
# where                        w                            查看所在的位置
# !                           无                           在pdb中执行语句
 

>>>简单示例

# -*- coding:gbk -*-
# file: prime.py
#
import math
# isprime函数判断一个整数是否为素数
# 如果i能被2到i的平方根内的任意一个数整除,
# 则i不是素数,返回0,否则i是素数,返回1。
def isprime(i):
    for t in range(2, int(math.sqrt(i)) + 1):
        if i % t == 0:
            return 0
print('100~110之间素数有: ')
for i in range(100, 110):
    if isprime(i):
        print(i)
 

先运行下面命令:

d:LearnPython>python -m pdb prime.py
 

后输入以下命令:

d:LearnPython>python -m pdb prime.py
> d:learnpythonprime.py(4)<module>()
-> import math
(Pdb) list                                           # 运行前面命令后停在这里,list默认只列出11行
  1     # -*- coding:gbk -*-
  2     # file: prime.py
  3     #
  4  -> import math
  5     # isprime函数判断一个整数是否为素数
  6     # 如果i能被2到i的平方根内的任意一个数整除,
  7     # 则i不是素数,返回0,否则i是素数,返回1。
  8     def isprime(i):
  9         for t in range(2, int(math.sqrt(i)) + 1):
 10             if i % t == 0:
 11                 return 0
(Pdb) l 14,17                                        # 使用list命令,列出14行,到17行
 14     print('100~110之间素数有: ')
 15     for i in range(100, 110):
 16         if isprime(i):
 17             print(i)
(Pdb) b 14                                           # 使用break命令设置断点
Breakpoint 1 at d:learnpythonprime.py:14          # 返回断点编号: 1
(Pdb) b isprime                                      # 在函数isprime设置断点
Breakpoint 2 at d:learnpythonprime.py:8           # 返回断点编号: 2
(Pdb) c                                              # 使用c命令运行运行脚本
> d:learnpythonprime.py(14)<module>()             # 停在断点1处,即第14行
-> print('100~110之间素数有: ')
(Pdb) c                                              # 使用c命令继续运行脚本
100~110之间素数有:                                   # 第14行脚本输出
> d:learnpythonprime.py(9)isprime()               # 停在断点2,即isprime函数处
-> for t in range(2, int(math.sqrt(i)) + 1):
(Pdb) b 15                                           # 在第15行处设置断点
Breakpoint 3 at d:learnpythonprime.py:15
(Pdb) disable 2                                      # 禁用断点2,即isprime函数处的断点
(Pdb) c                                              # 使用c命令继续运行脚本
> d:learnpythonprime.py(15)<module>()             # 停在断点3处,即第15行
-> for i in range(100, 110):
(Pdb) print(i)                                       # 使用print打印变量i的值
100
(Pdb) c                                              # 继续运行脚本
> d:learnpythonprime.py(15)<module>()
-> for i in range(100, 110):
(Pdb) p i                                            # 打印i的值
101
(Pdb) enable 2                                       # 恢复断点2,即isprime函数处的断点
(Pdb) c                                              # 继续运行脚本
> d:learnpythonprime.py(9)isprime()
-> for t in range(2, int(math.sqrt(i)) + 1):
(Pdb) n                                              # 单步执行下一条语句
> d:learnpythonprime.py(10)isprime()
-> if i % t == 0:
(Pdb) print(t)                                       # 使用print打印变量t的值
2
(Pdb) cl                                             # 清楚所有断点,输入y确认
Clear all breaks&#63; y
(Pdb) c                                              # 继续运行脚本
103
105
107
109
(Pdb) q                                              # 使用quit(q)退出pdb调试


python中使用pdb模块调试Python程序就是这样,欢迎大家参考。。。。

Python中多进程并发(multiprocessing)用法实例详解

Python中多进程并发(multiprocessing)用法是如何来使用的呢?下面的内容将会通过具体的实例来演示Python中多进程并发(multiprocessing)用法的使用方法及相关技巧:

本文实例讲述了Python多进程并发(multiprocessing)用法。分享给大家供大家参考。具体分析如下:

由于Python设计的限制(我说的是咱们常用的CPython)。最多只能用满1个CPU核心。
Python提供了非常好用的多进程包multiprocessing,你只需要定义一个函数,Python会替你完成其他所有事情。借助这个包,可以轻松完成从单进程到并发执行的转换。

1、新建单一进程

如果我们新建少量进程,可以如下:

import multiprocessing
import time
def func(msg):
  for i in xrange(3):
    print msg
    time.sleep(1)
if __name__ == "__main__":
  p = multiprocessing.Process(target=func, args=("hello", ))
  p.start()
  p.join()
  print "Sub-process done."
 

2、使用进程池

是的,你没有看错,不是线程池。它可以让你跑满多核CPU,而且使用方法非常简单。

注意要用apply_async,如果落下async,就变成阻塞版本了。

processes=4是最多并发进程数量。

import multiprocessing
import time
def func(msg):
  for i in xrange(3):
    print msg
    time.sleep(1)
if __name__ == "__main__":
  pool = multiprocessing.Pool(processes=4)
  for i in xrange(10):
    msg = "hello %d" %(i)
    pool.apply_async(func, (msg, ))
  pool.close()
  pool.join()
  print "Sub-process(es) done."
 

3、使用Pool,并需要关注结果

更多的时候,我们不仅需要多进程执行,还需要关注每个进程的执行结果,如下:

import multiprocessing
import time
def func(msg):
  for i in xrange(3):
    print msg
    time.sleep(1)
  return "done " + msg
if __name__ == "__main__":
  pool = multiprocessing.Pool(processes=4)
  result = []
  for i in xrange(10):
    msg = "hello %d" %(i)
    result.append(pool.apply_async(func, (msg, )))
  pool.close()
  pool.join()
  for res in result:
    print res.get()
  print "Sub-process(es) done."


Python中多进程并发(multiprocessing)用法就是这样,欢迎大家参考。。。。

python中子进程间实现通信的方法介绍

python中子进程间实现通信的方法是如何来实现的呢?下面的内容将会通过具体的实例来演示python中子进程间实现通信的方法的实现方法及相关技巧:

本文实例讲述了python执行子进程实现进程间通信的方法。分享给大家供大家参考。具体实现方法如下:

a.py:

import subprocess, time
subproc = subprocess.Popen(['c:python31python.exe', 'c:/b.py'], stdin=subprocess.PIPE, shell=True)
time.sleep(0.5)
print('start')
subproc.stdin.write('datan')
subproc.communicate('datan')
print('end')
 

b.py:

import sys
print('receive...')
s = sys.stdin.readline()
print('get:', len(s), s)


python中子进程间实现通信的方法就是这样,欢迎大家参考。。。。

Python中如何使用ElementTree解析XML

Python中使用ElementTree解析XML是如何来实现的呢?下面的内容将会通过具体的实例来演示Python中使用ElementTree解析XML的实现方法及相关技巧:

【XML基本概念介绍】

XML 指可扩展标记语言(eXtensible Markup Language)。
XML 被设计用来传输和存储数据。
概念一:

<foo>      # foo元素的起始标签
</foo>     # foo元素的结束标签
           # note: 每一个起始标签必须有对应的结束标签来闭合, 也可以写成<foo/>
 

概念二:

<foo>           # 元素可以嵌套到任意参次
  <bar></bar>   # bar元素为foo元素的子元素
</foo>          # 父元素foo的结束标签
 

概念三:

<foo lang='EN'>                  # foo元素有个lang的属性,该属性值为: EN;对应Python字典(Name-Value)对;
  <bar id='001' lang="CH"></bar> # bar元素有个lang的属性,该属性值为: CH;还有个id属性,值为:001,放置在''或“”中;
</foo>                           # bar元素中的lang属性不会和foo元素中相冲突,每个元素都有独立的属性集;
 

概念四:

<title>Learning Python</title> # 元素可以有文本内容
                                # Note:如果一个元素即没有文本内容,也没有子元素,则为空元素。
 

概念五:

<info>                                  # info元素为根节点
    <list id='001'> A </list>           # list元素为子节点
    <list id='002'> B </list>
    <list id='003'> C </list>
</info>
 

概念六:

<feed xmlns='http://www.w3.org/2005/Atom'>  # 可以通过声明xmlns来定义默认名字空间,feed元素处于http://www.w3.org/2005/Atom命名空间中
  <title>dive into mark</title>             # title元素也是。名字空间声明不仅会作用于当前声明它的元素,还会影响到该元素的所有子元素
</feed>
也可以通过xmlns:prefix声明来定义一个名字空间并取其名为prefix。
然后该名字空间中的每个元素都必须显式地使用这个前缀(prefix)来声明。
<atom:feed xmlns:atom='http://www.w3.org/2005/Atom'>  # feed属于命名空间atom
  <atom:title>dive into mark</atom:title>             # title元素同样属于该命名空间
</atom:feed>                                          # xmlns(XML Name Space)
 

【XML几种解析方法】

常见的XML编程接口有DOM和SAX,这两种接口处理XML文件的方式不同,使用场合自然也就不同。

Python有三种方法解析XML: SAX,DOM,以及ElementTree:

1.SAX (Simple API for XML )

Pyhton标准库包含SAX解析器,SAX用事件驱动模型,通过在解析XML的过程中触发一个个的事件并调用用户定义的回调函数来处理XML文件。SAX是一种基于事件驱动的API。利用SAX解析XML文档牵涉到两个部分:解析器和事件处理器。
解析器负责读取XML文档,并向事件处理器发送事件,如元素开始及结束事件;而事件处理器则负责对事件作出处理。
优点:SAX流式读取XML文件,比较快,占用内存少。
缺点:需要用户实现回调函数(handler)。

2.DOM(Document Object Model)

将XML数据在内存中解析成一个树,通过对树的操作来操作XML。一个DOM的解析器在解析一个XML文档时,一次性读取整个文档,把文档中所有元素保存在内存中的一个树结构里,之后你可以利用DOM提供的不同的函数来读取或修改文档的内容和结构,也可以把修改过的内容写入xml文件。
优点:使用DOM的好处是你不需要对状态进行追踪,因为每一个节点都知道谁是它的父节点,谁是子节点.
缺点:DOM需要将XML数据映射到内存中的树,一是比较慢,二是比较耗内存,使用起来也比较麻烦!

3.ElementTree(元素树)

ElementTree就像一个轻量级的DOM,具有方便友好的API。代码可用性好,速度快,消耗内存少。
相比而言,第三种方法,即方便,又快速,我们一直用它!下面介绍用元素树如何解析XML:

【ElementTree解析】

两种实现

ElementTree生来就是为了处理XML ,它在Python标准库中有两种实现。
一种是纯Python实现,例如: xml.etree.ElementTree
另外一种是速度快一点的: xml.etree.cElementTree
尽量使用C语言实现的那种,因为它速度更快,而且消耗的内存更少! 在程序中可以这样写:

try:
    import xml.etree.cElementTree as ET
except ImportError:
    import xml.etree.ElementTree as ET
 

常用方法

# 当要获取属性值时,用attrib方法。
# 当要获取节点值时,用text方法。
# 当要获取节点名时,用tag方法。
 

示例XML

<&#63;xml version="1.0" encoding="utf-8"&#63;>
<info>
   <intro>Book message</intro>
    <list id='001'>
        <head>bookone</head>
        <name>python check</name>
        <number>001</number>
        <page>200</page>
    </list>
    <list id='002'>
        <head>booktwo</head>
        <name>python learn</name>
        <number>002</number>
        <page>300</page>
    </list>
</info>
 

###########
## 加载XML
###########

方法一:加载文件

root = ET.parse('book.xml')
 

方法二:加载字符串

root = ET.fromstring(xmltext)
 

###########
## 获取节点
###########

方法一:获得指定节点->getiterator()方法

book_node = root.getiterator('list')
 

方法二:获得指定节点->findall()方法

book_node = root.findall('list')
 

方法三:获得指定节点->find()方法

book_node = root.find('list')
 

方法四:获得儿子节点->getchildren()

for node in book_node:
    book_node_child = node.getchildren()[0]
    print book_node_child.tag, '=> ', book_node_child.text
 

###########
## 例子01
###########

# coding=utf-8
try:                                           # 导入模块
    import xml.etree.cElementTree as ET
except ImportError:
    import xml.etree.ElementTree as ET
root   = ET.parse('book.xml')                 # 分析XML文件
books  = root.findall('/list')                # 查找所有根目录下的list的子节点
for book_list in books:                       # 对查找后的结果遍历
    print "=" * 30                            # 输出格式
    for book in book_list:                    # 对每个子节点再进行遍历,找出里面你的属性及值
        if book.attrib.has_key('id'):         # 一句id来做条件判断
            print "id:", book.attrib['id']    # 根据id打印出属性值
        print book.tag + '=> ' + book.text    # 输出标签及文本内容
print "=" * 30
 

输出结果:

==============================
head=> bookone
name=> python check
number=> 001
page=> 200
==============================
head=> booktwo
name=> python learn
number=> 002
page=> 300
==============================


Python中使用ElementTree解析XML就是这样,欢迎大家参考。。。。

python中实现守护进程的实例

python中实现守护进程的实例是如何来实现的呢?下面的内容将会通过具体的实例来演示python中实现守护进程的实例的实现方法及相关技巧:

本文实例讲述了python实现的守护进程(Daemon)用法。分享给大家供大家参考。具体如下:

def createDaemon():
  "'Funzione che crea un demone per eseguire un determinato programma…"'
  import os
  # create - fork 1
  try:
    if os.fork() > 0: os._exit(0) # exit father…
  except OSError, error:
    print 'fork #1 failed: %d (%s)' % (error.errno, error.strerror)
    os._exit(1)
  # it separates the son from the father
  os.chdir('/')
  os.setsid()
  os.umask(0)
  # create - fork 2
  try:
    pid = os.fork()
    if pid > 0:
      print 'Daemon PID %d' % pid
      os._exit(0)
  except OSError, error:
    print 'fork #2 failed: %d (%s)' % (error.errno, error.strerror)
    os._exit(1)
  funzioneDemo() # function demo
def funzioneDemo():
  import time
  fd = open('/tmp/demone.log', 'w')
  while True:
    fd.write(time.ctime()+'n')
    fd.flush()
    time.sleep(2)
  fd.close()
if __name__ == '__main__':
  createDaemon()


python中实现守护进程的实例就是这样,欢迎大家参考。。。。

python如何统计cpu利用率

python统计cpu利用率是如何来实现的呢?下面的内容将会通过具体的实例来演示python统计cpu利用率的实现方法及相关技巧:

本文实例讲述了python统计cpu利用率的方法。分享给大家供大家参考。具体实现方法如下:

#-*-coding=utf-8-*-
import win32pdh
import time
# Counter paths
PROCESSOR_PERCENT = r'Processor(_Total)% Processor Time'
MEMORY_PERCENT = r'Memory% Committed Bytes In Use'
MEMORY_COMMITTED = r'MemoryCommitted Bytes'
PROCESS_BYTES = lambda x: r'Process(%s)Private Bytes' % x
class Query:
  def __init__(self):
    self.counters = {}
    self.query = None
    self.query = win32pdh.OpenQuery(None, 0)
  def add_counter(self, path):
    if win32pdh.ValidatePath(path) != 0:
      raise Exception('Invalid path: %s' % path)
    counter = win32pdh.AddCounter(self.query, path, 0)
    self.counters[path] = counter
  def remove_counter(self, path):
    win32pdh.RemoveCounter(self.counters[path])
    del self.counters[path]
  def get_values(self):
    values = {}
    win32pdh.CollectQueryData(self.query)
    for path in self.counters:
      status, value = win32pdh.GetFormattedCounterValue(
          self.counters[path], win32pdh.PDH_FMT_LONG)
      values[path] = value
    return values
sysinfo_query = Query()
sysinfo_query.add_counter(PROCESSOR_PERCENT)
sysinfo_query.add_counter(MEMORY_PERCENT)
sysinfo_query.get_values()
def get_sysinfo():
  """Return a tuple (mem_usage, cpu_usage)."""
  info = sysinfo_query.get_values()
  return info[MEMORY_PERCENT], info[PROCESSOR_PERCENT]
listcpu=[]
while True:
  time.sleep(2)
  x,y=get_sysinfo()
  listcpu.append(y)
  if len(listcpu)==10:
    icount=0
    for c in listcpu:
      if c>4:
        icount+=1
    if icount>5:
      print "在统计的1分钟内,cpu已经有5次大于4%"
    listcpu=[]
  print y


python统计cpu利用率就是这样,欢迎大家参考。。。。

Python中如何将脚本文件打包成可执行文件

Python中将脚本文件打包成可执行文件是如何来实现的呢?下面的内容将会通过具体的实例来演示Python中将脚本文件打包成可执行文件的实现方法及相关技巧:

将Python脚本文件包装成可执行文件,其目的有二:

一则: 不需要依赖Python编译器就可以运行软件
二则: 不想让自己的源码公布出去

常用的工具有: py2exe、cx_freeze等

【工具:py2exe】

安装py2exe
安装该工具很简单:
只需要从官方网站:http://www.py2exe.org/下载与版本对应的安装程序,点击下一步即可完成安装。
安装后,执行import py2exe,不报错则表示安装成功!

>>> import py2exe
>>>
 

NOTE: 目前该工具只支持到Python2.7, 对于Python3而言,必须借助另外一个工具:cx_freeze

使用py2exe

第一步: 准备源代码,假如名为:Hello.py

Python中如何将脚本文件打包成可执行文件

第二步: 准备编译脚本,假如名为:setup.py

from distutils.core import setup
import py2exe
setup(windows=['Hello.py'])
 

第三步: 运行命令: setup.py py2exe

D:temp>setup.py py2exe
 

Python中如何将脚本文件打包成可执行文件

运行之后,会在我当前运行的目录下(D:temp)默认生成dict目录,里面的文件如下:

默认情况下,py2exe在目录dist下创建以下这些必须的文件:
1、一个或多个exe文件。如本例为: Hello.exe
2、python##.dll。 如本例中: Python27.dll
3、.pyd文件,它们是已编译的扩展名,它们是exe文件所需要的;加上其它的.dll文件,这些.dll是.pyd所需要的。
4、一个library.zip文件,它包含了已编译的纯的python模块如.pyc或.pyo

第四步: 双击Hello.exe可执行文件,跟源代码运行后同样的结果:

其他

1: 执行setup.py –help获取帮助信息

Global options:
  --verbose (-v)  run verbosely (default)
  --quiet (-q)    run quietly (turns verbosity off)
  --dry-run (-n)  don't actually do anything
  --help (-h)     show detailed help message
  --no-user-cfg   ignore pydistutils.cfg in your home directory
Options for 'py2exe' command:
  --optimize (-O)       optimization level: -O1 for "python -O", -O2 for
                        "python -OO", and -O0 to disable [default: -O0]
  --dist-dir (-d)       directory to put final built distributions in (default
                        is dist)
  --excludes (-e)       comma-separated list of modules to exclude
  --dll-excludes        comma-separated list of DLLs to exclude
  --ignores             comma-separated list of modules to ignore if they are
                        not found
  --includes (-i)       comma-separated list of modules to include
  --packages (-p)       comma-separated list of packages to include
  --compressed (-c)     create a compressed zipfile
  --xref (-x)           create and show a module cross reference
  --bundle-files (-b)   bundle dlls in the zipfile or the exe. Valid levels
                        are 1, 2, or 3 (default)
  --skip-archive        do not place Python bytecode files in an archive, put
                        them directly in the file system
  --ascii (-a)          do not automatically include encodings and codecs
  --custom-boot-script  Python file that will be run when setting up the
                        runtime environment
usage: setup.py [global_opts] cmd1 [cmd1_opts] [cmd2 [cmd2_opts] ...]
   or: setup.py --help [cmd1 cmd2 ...]
   or: setup.py --help-commands
   or: setup.py cmd --help
 

2: 一个详细的编译脚本

# -*- coding: cp936 -*-
from distutils.core import setup
import py2exe
includes = ["encodings", "encodings.*"]
options = {"py2exe":
            {"compressed": 1,      # 压缩
             "optimize": 2,        # 优化级别
             "ascii": 1,           #
             "includes":includes,  # 编码方式
             "bundle_files": 1     # 所有文件打包成一个zipfile或exe文件,有效级别1,2,3
            }}
setup(
    options=options,               # 是否需要可选项,默认为None
    zipfile=None,                  # 是否需要压缩像,默认为None
    console=[{"script": "HelloCmd.py", "icon_resources": [(1, "pc.ico")]}], # 针对CMD控制端口
    windows=[{"script": "HelloWin.py", "icon_resources": [(1, "pc.ico")]}], # 针对GUI图形窗口
    data_files=[("magic",["App_x86.exe",]),],
    version = "v1.01",             # 版本信息
    description = "py2exe testing",# 描述信息
    name = "Hello, Py2exe",        # 名字信息
)


Python中将脚本文件打包成可执行文件就是这样,欢迎大家参考。。。。

Python下如何安装lxml模块

Python下安装lxml模块是如何来实现的呢?下面的内容将会通过具体的实例来演示Python下安装lxml模块的实现方法及相关技巧:

lxml是Python中与XML及HTML相关功能中最丰富和最容易使用的库。lxml并不是Python自带的包,而是为libxml2和libxslt库的一个Python化的绑定。它与众不同的地方是它兼顾了这些库的速度和功能完整性,以及纯Python API的简洁性,与大家熟知的ElementTree API兼容但比之更优越!但安装lxml却又有点麻烦,因为存在依赖,直接安装的话用easy_install, pip都不能成功,会报gcc错误。下面列出来Windows、Linux下面的安装方法:

【Windows系统】

先确保Python已经安装好,环境变量也配置好了,相应的的easy_install、pip也安装好了.

1. 执行 pip install virtualenv

C:>pip install virtualenv
Requirement already satisfied (use --upgrade to upgrade): virtualenv in c:python27libsite-package
svirtualenv-12.0.4-py2.7.egg
 

2. 从官方网站下载与系统,Python版本匹配的lxml文件:
http://pypi.python.org/pypi/lxml/2.3/

NOTE:

比如说我的电脑是Python 2.7.4, 64位操作系统,那么我就可以下载
lxml-2.3-py2.7-win-amd64.egg (md5) # Python Egg

lxml-2.3.win-amd64-py2.7.exe (md5) # MS Windows installer

3. 执行 easy_install lxml-2.3-py2.7-win-amd64.egg
D:Downloads>easy_install lxml-2.3-py2.7-win-amd64.egg # 进入该文件所在目录执行该命令

Processing lxml-2.3-py2.7-win-amd64.egg
creating c:python27libsite-packageslxml-2.3-py2.7-win-amd64.egg
Extracting lxml-2.3-py2.7-win-amd64.egg to c:python27libsite-packages
Adding lxml 2.3 to easy-install.pth file
Installed c:python27libsite-packageslxml-2.3-py2.7-win-amd64.egg
Processing dependencies for lxml==2.3
Finished processing dependencies for lxml==2.3
 

NOTE:

1. 可用exe可执行文件,方法更简单直接安装就可以
2. 可用easy_install安装方式,也可以用pip的方式

#再执行下,就安装成功了!
>>> import lxml
>>>
 

3. 如用pip安装,常用命令就是:

pip install simplejson                      # 安装Python包
pip install --upgrade simplejson          # 升级Python包
pip uninstall simplejson                    # 卸载Python包
 

4. 如用Eclipse+Pydev的开发方式,需要移除旧包,重新加载一次

Window --> Preferences --> PyDev --> Interperter-python   # 否则导包的时候会报错
 

【Linux系统】

因为lxml依赖的包如下:

libxml2, libxml2-devel, libxlst, libxlst-devel, python-libxml2, python-libxslt
 

所以安装步骤如下:
第一步: 安装 libxml2

$ sudo apt-get install libxml2 libxml2-dev
 

第二步: 安装 libxslt

$ sudo apt-get install libxlst libxslt-dev
 

第三步: 安装 python-libxml2 和 python-libxslt

$ sudo apt-get install python-libxml2 python-libxslt
 

第四步: 安装 lxml

$ sudo easy_install lxml
 

参考官方文档:
http://codespeak.net/lxml/installation.html


Python下安装lxml模块就是这样,欢迎大家参考。。。。

python通过ssh-powershell监控windows的方法介绍

python通过ssh-powershell监控windows是如何来实现的呢?下面的内容将会通过具体的实例来演示python通过ssh-powershell监控windows的实现方法及相关技巧:

本文实例讲述了python通过ssh-powershell监控windows的方法。分享给大家供大家参考。具体分析如下:

对于服务器的监控来说,监控linux不管是自己动手写脚本还是用一些开源的工具比如nagios,zenoss什么的。但毕竟还是有些公司有windows做服务器的,相对linux来说,windows没有方便的shell,cmd下提供的命令对于监控来说远远没有linux方便。但是现在windows上如果安装了powershell(win7,2008自带),就比以前方便多了,linux上的命令基本都能在powershell里执行,比如查看进程还是ps.

自己封装了一个python通过ssh(通过pexpect模块)调用powershell的脚本,里面包快ps,netstat,ping检测,查看硬盘,cpu信息和负载,内存信息。通过创建ssh_win32类对象,然后调用它的方法,返回的都是解析好的python对象。

ssh_powershell.py:

#! /usr/bin/env python
# -*- coding: utf-8 -*-
import re
from pexpect import *
class ssh_win32:
  def __init__(self, user, host, password=None,systemroot='c',papath='',timeout=5,verbose=0):
    self.user = user#监控机器的username
    self.host = host#监控机器的ip
    self.verbose = verbose
    self.password = password#密码
    self.timeout=timeout#执行命令的timeout
    self.systemroot=systemroot#windows 所安装的盘符
    if not papath:#powershell.exe的路径
self.powershell_path=self.systemroot+':/WINDOWS/system32/WindowsPowerShell/v1.0/powershell.exe '
    self.key = [
      'authenticity',
      'assword:',
      '@@@@@@@@@@@@',
      'Command not found.',
      EOF,
      ]
    self.f = open('ssh.out','w')
  def ssh(self,command):
    cmd='ssh -l %s %s %s'%(self.user,self.host,command)
    print "cmd:",cmd
    con=spawn(cmd,timeout=self.timeout)
    seen=con.expect(self.key)
    if seen == 0:
      con.sendline('yes')
      seen = con.expect(self.key)
    if seen == 1:
  #    if not self.password:
  #      self.password = getpass.getpass('Remote password: ')
      con.sendline(self.password)
      try:
        res=con.read()
      except Exception ,e:
        res=con.before
#      print "res:",res
    return res
  def ssh_disk(self):
    cmd=self.powershell_path+"Get-WmiObject win32_logicaldisk"
    res=self.ssh(cmd)
    disk={}
    if res:
      res=res.split('No such file or directory')[-1].replace('r','').split('n')
      res=
#      print 'res:',res
    predisk='C'
    for d in res:
#      print d
      key,value=d.split(':',1)
#      print d
#      print 'key:',key,'value:',value
      key=key.strip()
      value=value.strip()
      if key=='DeviceID' and value not in disk.keys():
        predisk=value
        disk[predisk]={}
        disk[predisk][key]=value
      else:
        if key in ['FreeSpace','Size']:
          if value:
            value=int(value)/1024/1024/1024
        disk[predisk][key]=value
    for d in disk.keys():
      if disk[d]['DriveType']!='3':
        disk.pop(d)
#    print 'disk:',disk
    return disk
  def ssh_cpu(self):
    cmd=self.powershell_path+'gwmi -computername localhost win32_Processor'
    res=self.ssh(cmd)
    res=res.split('No such file or directory')[-1].replace('r','').split('n')
    res=[r for r in res if r]
#    print res
    cpu={}
    for i in res:
#      print '='*10
#      print i
      i=i.split(':')
    #  print i
      if len(i)==2:
        key,value=i
      else:
        continue
      key=key.strip()
      value=value.strip()
#      print 'key:',key
#      print 'value:',value
      cpu[key]=value
    return cpu
  def ssh_memory(self):
    totalmem=self.powershell_path+'Get-WmiObject win32_OperatingSystem TotalVisibleMemorySize'
    freemem=self.powershell_path+'Get-WmiObject win32_OperatingSystem FreePhysicalMemory'
    memory={}
    for cmd in [totalmem,freemem]:
      res=self.ssh(cmd)
      if 'Win32_OperatingSystem' in res:
        res=res=res.replace('r','').split('n')
        res=[m for m in res if m][-1]
        print 'res:',res
        key,value=res.split(':')
        key=key.strip()
        value=value.strip()
        memory[key]=value
      else:
        print "not return data"
        return None
    return memory
  def ssh_ping(self,host):
    cmd='ping -n 1 %s'%host
    patt=r'.+&#63;(d*)% loss.*'
    res=self.ssh(cmd).replace('r','').replace('n','')
    print res
    m=re.match(patt,res)
    if m:
      lost_percent=m.group(1)
      print 'lost_percent:',lost_percent
      return int(lost_percent)
    else:
      return None
  def ssh_ps(self):
    cmd=self.powershell_path+'ps'
    res=self.ssh(cmd)
    ps=[]
    if '-- -----------' in res:
      res=res.replace('r','').split('-- -----------')[-1].split('n')
      res=[d for d in res if d.strip()]
      for p in res:
        process={}
        row=[para for para in p.split(' ') if para.strip()]
        process['handles']=row[0]
        process['npm']=row[1]
        process['pm']=row[2]
        process['ws']=row[3]
        process['vm']=row[4]
        process['cpu']=row[5]
        process['id']=row[6]
        process['process_name']=row[-1]
        ps.append(process)
#      print ps
      return ps
    else:
      return None
  def ssh_netstat(self):
    cmd='netstat -ao'
    res=self.ssh(cmd)
    netstat=[]
    if 'PID' in res:
      res=res.replace('r','').split('PID')[-1].split('n')
      res=[d for d in res if d.strip()]
      for p in res:
        process={}
        row=[para for para in p.split(' ') if para.strip()]
        process['proto']=row[0]
        process['local_address']=row[1]
        process['foreign_address']=row[2]
        process['state']=row[3]
        process['pid']=row[-1]
        netstat.append(process)
#      print netstat
      return netstat
    else:
      return None
if __name__ == "__main__":
cmd="c:/WINDOWS/system32/WindowsPowerShell/v1.0/powershell.exe ps"
  user='admin'
  host='192.168.123.105'
  password='123456'
  ssh=ssh_win32(user,host,password,systemroot='c',timeout=5)
#  print ssh.ssh_cpu()
#  print "nnnn"
#  print ssh.ssh_disk()
#  print "nnnn"
#  print ssh.ssh_memory()
#  print ssh.ssh_ping(host)
#  print ssh.ssh_ps()
#  print ssh.ssh_netstat()


python通过ssh-powershell监控windows就是这样,欢迎大家参考。。。。

python字符串编码识别模块chardet的用法介绍

python字符串编码识别模块chardet是如何来使用的呢?下面的内容将会通过具体的实例来演示python字符串编码识别模块chardet的使用方法及相关技巧:

python的字符串编码识别模块(第三方库):

官方地址: http://pypi.python.org/pypi/chardet

import chardet
import urllib
# 可根据需要,选择不同的数据
TestData = urllib.urlopen('http://www.baidu.com/').read()
print chardet.detect(TestData)
# 运行结果:
# {'confidence': 0.99, 'encoding': 'GB2312'}
运行结果表示有99%的概率认为这段代码是GB2312编码方式。
import urllib
from chardet.universaldetector import UniversalDetector
usock = urllib.urlopen('http://www.baidu.com/')
# 创建一个检测对象
detector = UniversalDetector()
for line in usock.readlines():
# 分块进行测试,直到达到阈值
detector.feed(line)
if detector.done: break
# 关闭检测对象
detector.close()
usock.close()
# 输出检测结果
print detector.result
# 运行结果:
# {'confidence': 0.99, 'encoding': 'GB2312'}
 

应用背景,如果要对一个大文件进行编码识别,使用这种高级的方法,可以只读一部,去判别编码方式从而提高检测速度。如果希望使用一个检测对象检测多个数据,在每次检测完,一定要运行一下detector.reset()。清除之前的数据。


python字符串编码识别模块chardet就是这样,欢迎大家参考。。。。

python中不同类型方法的介绍

下面的内容主要介绍了python中各种方法的介绍,比如python中的静态方法,抽象方法,类方法,构造方法的使用及相关技巧,欢迎大家参考:

方法在Python中是如何工作的

方法就是一个函数,它作为一个类属性而存在,你可以用如下方式来声明、访问一个函数:

>>> class Pizza(object):
...   def __init__(self, size):
...     self.size = size
...   def get_size(self):
...     return self.size
...
>>> Pizza.get_size
<unbound method Pizza.get_size>
 

Python在告诉你,属性_get_size是类Pizza的一个未绑定方法。这是什么意思呢?很快我们就会知道答案:

>>> Pizza.get_size()
Traceback (most recent call last):
 File "<stdin>", line 1, in <module>
TypeError: unbound method get_size() must be called with Pizza instance as first argument (got nothing instead)
 

我们不能这么调用,因为它还没有绑定到Pizza类的任何实例上,它需要一个实例作为第一个参数传递进去(Python2必须是该类的实例,Python3中可以是任何东西),尝试一下:

>>> Pizza.get_size(Pizza(42))
 

太棒了,现在用一个实例作为它的的第一个参数来调用,整个世界都清静了,如果我说这种调用方式还不是最方便的,你也会这么认为的;没错,现在每次调用这个方法的时候我们都不得不引用这个类,如果不知道哪个类是我们的对象,长期看来这种方式是行不通的。

那么Python为我们做了什么呢,它绑定了所有来自类_Pizza的方法以及该类的任何一个实例的方法。也就意味着现在属性get_size是Pizza的一个实例对象的绑定方法,这个方法的第一个参数就是该实例本身。

>>> Pizza(42).get_size
<bound method Pizza.get_size of <__main__.Pizza object at 0x7f3138827910>>
>>> Pizza(42).get_size()
42
 

和我们预期的一样,现在不再需要提供任何参数给_get_size,因为它已经是绑定的,它的self参数会自动地设置给Pizza实例,下面代码是最好的证明:

>>> m = Pizza(42).get_size
>>> m()
42
 

更有甚者,你都没必要使用持有Pizza对象的引用了,因为该方法已经绑定到了这个对象,所以这个方法对它自己来说是已经足够了。

也许,如果你想知道这个绑定的方法是绑定在哪个对象上,下面这种手段就能得知:

>>> m = Pizza(42).get_size
>>> m.__self__
<__main__.Pizza object at 0x7f3138827910>
>>>
# You could guess, look at this:
...
>>> m == m.__self__.get_size
True
 

显然,该对象仍然有一个引用存在,只要你愿意你还是可以把它找回来。

在Python3中,依附在类上的函数不再当作是未绑定的方法,而是把它当作一个简单地函数,如果有必要它会绑定到一个对象身上去,原则依然和Python2保持一致,但是模块更简洁:

>>> class Pizza(object):
...   def __init__(self, size):
...     self.size = size
...   def get_size(self):
...     return self.size
...
>>> Pizza.get_size
<function Pizza.get_size at 0x7f307f984dd0>
 

静态方法

静态方法是一类特殊的方法,有时你可能需要写一个属于这个类的方法,但是这些代码完全不会使用到实例对象本身,例如:

class Pizza(object):
  @staticmethod
  def mix_ingredients(x, y):
    return x + y
  def cook(self):
    return self.mix_ingredients(self.cheese, self.vegetables)
 

这个例子中,如果把_mix_ingredients作为非静态方法同样可以运行,但是它要提供self参数,而这个参数在方法中根本不会被使用到。这里的@staticmethod装饰器可以给我们带来一些好处:

Python不再需要为Pizza对象实例初始化一个绑定方法,绑定方法同样是对象,但是创建他们需要成本,而静态方法就可以避免这些。

>>> Pizza().cook is Pizza().cook
False
>>> Pizza().mix_ingredients is Pizza.mix_ingredients
True
>>> Pizza().mix_ingredients is Pizza().mix_ingredients
True
 

可读性更好的代码,看到@staticmethod我们就知道这个方法并不需要依赖对象本身的状态。
可以在子类中被覆盖,如果是把mix_ingredients作为模块的顶层函数,那么继承自Pizza的子类就没法改变pizza的mix_ingredients了如果不覆盖cook的话。

类方法

话虽如此,什么是类方法呢?类方法不是绑定到对象上,而是绑定在类上的方法。

>>> class Pizza(object):
...   radius = 42
...   @classmethod
...   def get_radius(cls):
...     return cls.radius
...
>>>
>>> Pizza.get_radius
<bound method type.get_radius of <class '__main__.Pizza'>>
>>> Pizza().get_radius
<bound method type.get_radius of <class '__main__.Pizza'>>
>>> Pizza.get_radius is Pizza().get_radius
True
>>> Pizza.get_radius()
42
 

无论你用哪种方式访问这个方法,它总是绑定到了这个类身上,它的第一个参数是这个类本身(记住:类也是对象)。

什么时候使用这种方法呢?类方法通常在以下两种场景是非常有用的:

工厂方法:它用于创建类的实例,例如一些预处理。如果使用@staticmethod代替,那我们不得不硬编码Pizza类名在函数中,这使得任何继承Pizza的类都不能使用我们这个工厂方法给它自己用。

class Pizza(object):
  def __init__(self, ingredients):
    self.ingredients = ingredients
  @classmethod
  def from_fridge(cls, fridge):
    return cls(fridge.get_cheese() + fridge.get_vegetables())
 

调用静态类:如果你把一个静态方法拆分成多个静态方法,除非你使用类方法,否则你还是得硬编码类名。使用这种方式声明方法,Pizza类名明永远都不会在被直接引用,继承和方法覆盖都可以完美的工作。

class Pizza(object):
  def __init__(self, radius, height):
    self.radius = radius
    self.height = height
  @staticmethod
  def compute_area(radius):
     return math.pi * (radius ** 2)
  @classmethod
  def compute_volume(cls, height, radius):
     return height * cls.compute_area(radius)
  def get_volume(self):
    return self.compute_volume(self.height, self.radius)
 

抽象方法

抽象方法是定义在基类中的一种方法,它没有提供任何实现,类似于Java中接口(Interface)里面的方法。

在Python中实现抽象方法最简单地方式是:

class Pizza(object):
  def get_radius(self):
    raise NotImplementedError
 

任何继承自_Pizza的类必须覆盖实现方法get_radius,否则会抛出异常。

这种抽象方法的实现有它的弊端,如果你写一个类继承Pizza,但是忘记实现get_radius,异常只有在你真正使用的时候才会抛出来。

>>> Pizza()
<__main__.Pizza object at 0x7fb747353d90>
>>> Pizza().get_radius()
Traceback (most recent call last):
 File "<stdin>", line 1, in <module>
 File "<stdin>", line 3, in get_radius
NotImplementedError
 

还有一种方式可以让错误更早的触发,使用Python提供的abc模块,对象被初始化之后就可以抛出异常:

import abc
class BasePizza(object):
  __metaclass__ = abc.ABCMeta
  @abc.abstractmethod
  def get_radius(self):
"""Method that should do something."""
 

使用abc后,当你尝试初始化BasePizza或者任何子类的时候立马就会得到一个TypeError,而无需等到真正调用get_radius的时候才发现异常。

>>> BasePizza()
Traceback (most recent call last):
 File "<stdin>", line 1, in <module>
TypeError: Can't instantiate abstract class BasePizza with abstract methods get_radius
 

混合静态方法、类方法、抽象方法

当你开始构建类和继承结构时,混合使用这些装饰器的时候到了,所以这里列出了一些技巧。

记住,声明一个抽象的方法,不会固定方法的原型,这就意味着虽然你必须实现它,但是我可以用任何参数列表来实现:

import abc
class BasePizza(object):
  __metaclass__ = abc.ABCMeta
  @abc.abstractmethod
  def get_ingredients(self):
"""Returns the ingredient list."""
class Calzone(BasePizza):
  def get_ingredients(self, with_egg=False):
    egg = Egg() if with_egg else None
    return self.ingredients + egg
 

这样是允许的,因为Calzone满足BasePizza对象所定义的接口需求。同样我们也可以用一个类方法或静态方法来实现:

import abc
class BasePizza(object):
  __metaclass__ = abc.ABCMeta
  @abc.abstractmethod
  def get_ingredients(self):
"""Returns the ingredient list."""
class DietPizza(BasePizza):
  @staticmethod
  def get_ingredients():
    return None
 

这同样是正确的,因为它遵循抽象类BasePizza设定的契约。事实上get_ingredients方法并不需要知道返回结果是什么,结果是实现细节,不是契约条件。

因此,你不能强制抽象方法的实现是一个常规方法、或者是类方法还是静态方法,也没什么可争论的。从Python3开始(在Python2中不能如你期待的运行,见issue5867),在abstractmethod方法上面使用@staticmethod和@classmethod装饰器成为可能。

import abc
class BasePizza(object):
  __metaclass__ = abc.ABCMeta
  ingredient = ['cheese']
  @classmethod
  @abc.abstractmethod
  def get_ingredients(cls):
"""Returns the ingredient list."""
     return cls.ingredients
 

别误会了,如果你认为它会强制子类作为一个类方法来实现get_ingredients那你就错了,它仅仅表示你实现的get_ingredients在BasePizza中是一个类方法。

可以在抽象方法中做代码的实现?没错,Python与Java接口中的方法相反,你可以在抽象方法编写实现代码通过super()来调用它。(译注:在Java8中,接口也提供的默认方法,允许在接口中写方法的实现)

import abc
class BasePizza(object):
  __metaclass__ = abc.ABCMeta
  default_ingredients = ['cheese']
  @classmethod
  @abc.abstractmethod
  def get_ingredients(cls):
"""Returns the ingredient list."""
     return cls.default_ingredients
class DietPizza(BasePizza):
  def get_ingredients(self):
    return ['egg'] + super(DietPizza, self).get_ingredients()
 

这个例子中,你构建的每个pizza都通过继承BasePizza的方式,你不得不覆盖get_ingredients方法,但是能够使用默认机制通过super()来获取ingredient列表。


python中各种方法的介绍就是这样,欢迎大家参考。。。。

python批量抓取新浪博客页面内容的方法

python批量抓取新浪博客页面内容的方法是如何来实现的呢?下面的内容将会通过具体的实例来演示python批量抓取新浪博客页面内容的方法的实现方法及相关技巧:

本文实例讲述了python实现批量下载新浪博客的方法。分享给大家供大家参考。具体实现方法如下:

# coding=utf-8
import urllib2
import sys, os
import re
import string
from BeautifulSoup import BeautifulSoup
def encode(s):
  return s.decode('utf-8').encode(sys.stdout.encoding, 'ignore')
def getHTML(url):
  #proxy_handler = urllib2.ProxyHandler({'http':'http://211.138.124.211:80'})
  #opener = urllib2.build_opener(proxy_handler)
  #urllib2.install_opener(opener)
  req = urllib2.Request(url)
  response = urllib2.urlopen(req, timeout=15)
  return BeautifulSoup(response, convertEntities=BeautifulSoup.HTML_ENTITIES)
def visible(element):
  '''抓取可见的文本元素'''
  if element.parent.name in ['style', 'script', '[document]', 'head', 'title']:
    return False
  elif re.match('<!--.*-->', str(element)):
    return False
  elif element == u'xa0':
    return False
  return True
def delReturn(element):
  '''删除元素内的换行'''
  return re.sub('(&#63;<!^)n+(&#63;!$)', ' ', str(element)).decode('utf-8')
def validFilename(filename):
  # windows
  return re.sub('&#91;/:*&#63;<>"|xa0]', '', filename)
def writeToFile(text, filename, dirname):
  if not os.path.exists(dirname):
    os.makedirs(dirname)
    print encode('保存到目录'), dirname
  filename = validFilename(filename)
  print encode('保存文章'), filename
  path = os.path.join(dirname, filename)
  if not os.path.exists(path):
    f = open(path, 'w')
    f.write(text)
    f.close()
  else:
    print filename, encode('已经存在')
def formatContent(url, title=''):
  '''格式化文章内容'''
  page = getHTML(url)
  content = page.find('div', {'class':'articalContent'})
  art_id = re.search('blog_(w+).html', url).group(1)
  blog_name = page.find('span', id='blognamespan').string
  if title == '':
    title = page.find('h2', id=re.compile('^t_')).string
  temp_data = filter(visible, content.findAll(text=True)) # 去掉不可见元素
  temp_data = ''.join(map(delReturn, temp_data)) # 删除元素内的换行符
  temp_data = temp_data.strip() # 删除文章首尾的空行
  temp_data = re.sub('n{2,}', 'nn', temp_data) # 删除文章内过多的空行
  # 输出到文件
  # 编码问题
  temp_data = '本文地址:'.decode('utf-8') + url + 'nn' + temp_data
  op_text = temp_data.encode('utf-8')
  op_file = title + '_' + art_id +'.txt'
  writeToFile(op_text, op_file, blog_name)
def articlelist(url):
  articles = {}
  page = getHTML(url)
  pages = page.find('ul', {'class':'SG_pages'}).span.string
  page_num = int(re.search('(d+)', pages).group(1))
  for i in range(1, page_num+1):
    print encode('生成第%d页文章索引'%i)
    if i != 1:
      url = re.sub('(_)d+(.html)$', 'g<1>'+str(i)+'g<2>', url)
      page = getHTML(url)
    article = page.findAll('span', {'class':'atc_title'})
    for art in article:
      art_title = art.a['title']
      art_href = art.a['href']
      articles[art_title] = art_href
  return articles
def blog_dld(articles):
  if not isinstance(articles, dict):
    return False
  print encode('开始下载文章')
  for art_title, art_href in articles.items():
    formatContent(art_href, art_title)
if __name__ == '__main__':
  sel = raw_input(encode('你要下载的是(1)全部文章还是(2)单篇文章,输入1或者2: '))
  if sel == '1':
    #articlelist_url = 'http://blog.sina.com.cn/s/articlelist_1303481411_0_1.html'
    articlelist_url = raw_input(encode('请输入博客文章目录链接: '))
    articles = articlelist(articlelist_url)
    blog_dld(articles)
  else:
    #article_url = 'http://blog.sina.com.cn/s/blog_4db18c430100gxc5.html'
    article_url = raw_input(encode('请输入博客文章链接: '))
    formatContent(article_url)


python批量抓取新浪博客页面内容的方法就是这样,欢迎大家参考。。。。

构建Python包的五个简单准则介绍

当我们在开发python应用的时候,如果相关的模块很多的话,我们会考虑将所有的模块放到一个包下面,从而构建一个强健的应用,下面的内容主要介绍了构建Python包的五个简单准则,欢迎大家参考:

创建一个软件包(package)似乎已经足够简单了,也就是在文件目录下搜集一些模块,再加上一个__init__.py文件,对吧?我们很容易看出来,随着时间的推移,通过对软件包的越来越多的修改,一个设计很差的软件包可能会出现循环依赖问题,或是可能变得不可移植和不可靠。
1. __init__.py 仅为导入服务

对于一个简单的软件包,你可能会忍不住把工具方法,工厂方法和异常处理都丢进__init__.py,千万别这样!

一个结构良好的__init__.py文件,仅为一个非常重要的目的来服务:从子模块导入。你的__init__.py应该看起来像这个样子:

# ORDER MATTERS HERE -- SOME MODULES ARE DEPENDANT ON OTHERS
# 导入顺序要考虑——一些模块会依赖另外的一些
from exceptions import FSQError, FSQEnvError, FSQEncodeError,
            FSQTimeFmtError, FSQMalformedEntryError,
            FSQCoerceError, FSQEnqueueError, FSQConfigError,
            FSQPathError, FSQInstallError, FSQCannotLockError,
            FSQWorkItemError, FSQTTLExpiredError,
            FSQMaxTriesError, FSQScanError, FSQDownError,
            FSQDoneError, FSQFailError, FSQTriggerPullError,
            FSQHostsError, FSQReenqueueError, FSQPushError
# constants relies on: exceptions, internal
import constants
# const relies on: constants, exceptions, internal
from const import const, set_const
# has tests
# path relies on: exceptions, constants, internal
import path
# has tests
# lists relies on: path
from lists import hosts, queues
#...
 

2.使用__init__.py来限制导入顺序

  • 把方法和类置于软件包的作用域中,这样用户就不需要深入软件包的内部结构,使你的软包变得易用。
  • 作为调和导入顺序的唯一地方。

使用得当的话,__init__.py 可以为你提供重新组织内部软件包结构的灵活性,而不需要担心由内部导入子模块或是每个模块导入顺序所带来的副作用。因为你是以一个特定的顺序导入子模块,你的__init__.py 对于他程序员来讲应该简单易懂,并且能够明显的表示该软件包所能提供的全部功能。

文档字符串,以及在软件包层面对__all__属性的赋值应当是__init__.py中唯一的与导入模块不相关的代码:

__all__ = [ 'FSQError', 'FSQEnvError', 'FSQEncodeError', 'FSQTimeFmtError',
      'FSQMalformedEntryError', 'FSQCoerceError', 'FSQEnqueueError',
      'FSQConfigError', 'FSQCannotLock', 'FSQWorkItemError',
      'FSQTTLExpiredError', 'FSQMaxTriesError', 'FSQScanError',
      'FSQDownError', 'FSQDoneError', 'FSQFailError', 'FSQInstallError',
      'FSQTriggerPullError', 'FSQCannotLockError', 'FSQPathError',
      'path', 'constants', 'const', 'set_const', 'down', 'up',
# ...
     ]
 

3.使用一个模块来定义所有的异常

你也许已经注意到了,__init__.py中的第一个导入语句从exceptions.py子模块中导入了全部的异常。从这里出发,你将看到,在大多数的软件包中,异常被定义在引起它们的代码附近。尽管这样可以为一个模块提供高度的完整性,一个足够复杂的软件包会通过如下两种方式,使得这一模式出现问题。

通常一个模块/程序需要从一个子模块导入一个函数, 利用它导入代码并抛出异常。为了捕获异常并保持一定的粒度,你需要导入你需要的模块,以及定义了异常的模块(或者更糟,你要导入一系列的异常)。这一系列衍生出来的导入需求,是在你的软件包中编织一张错综复杂的导入之网的始作俑者。你使用这种方式的次数越多,你的软件包内部就变的越相互依赖,也更加容易出错。
随着异常数量的不断增长,找到一个软件包可能引发的全部异常变的越来越难。把所有的异常定义在一个单独的模块中,提供了一个方便的地方,在这里,程序员可以审查并确定你的软件包所能引发全部潜在错误状态。

你应该为你的软件包的异常定义一个基类:

class APackageException(Exception):
'''root for APackage Exceptions, only used to except any APackage error, never raised'''
  pass
 

然后确保你的软件包在任何错误状态下,只会引发这个基类异常的子类异常,这样如果你需要的话,你就可以阻止全部的异常:

try:
'''bunch of code from your package'''
except APackageException:
'''blanked condition to handle all errors from your package'''
 

对于一般的错误状态,这里有一些重要的异常处理已经被包括在标准库中了(例如,TypeError, ValueError等)

灵活地定义异常处理并保持足够的粒度:

# from fsq
class FSQEnvError(FSQError):
'''An error if something cannot be loaded from env, or env has an invalid
value'''
  pass
class FSQEncodeError(FSQError):
'''An error occured while encoding or decoding an argument'''
  pass
# ... and 20 or so more
 

在你的异常处理中保持更大的粒度,有利于让程序员们在一个try/except中包含越来越大的,互相不干涉的代码段。

# this
try:
  item = fsq.senqueue('queue', 'str', 'arg', 'arg')
  scanner = fsq.scan('queue')
except FSQScanError:
'''do something'''
except FSQEnqueueError:
'''do something else'''
# not this
try:
  item = fsq.senqueue('queue', 'str', 'arg', 'arg')
except FSQEnqueueError:
'''do something else'''
try:
  scanner = fsq.scan('queue')
except FSQScanError:
'''do something'''
# and definitely not
try:
  item = fsq.senqueue('queue', 'str', 'arg', 'arg')
  try:
    scanner = fsq.scan('queue')
  except FSQScanError:
'''do something'''
except FSQEnqueueError:
'''do something else'''
 

在异常定义时保持高度的粒度,会减少错综复杂的错误处理,并且允许你把正常执行指令和错误处理指令分别开来,使你的代码更加易懂和更易维护。
4. 在软件包内部只进行相对导入

在子模块中你时常见到的一个简单错误,就是使用软件包的名字来导入软件包。

# within a sub-module
from a_package import APackageError
 

这样做会导致两个不好的结果:

  1. 子模块只有当软件包被安装在 PYTHONPATH 内才能正确运行。
  2. 子模块只有当这个软件包的名字是 a_package 时才能正确运行。

尽管第一条看上去并不是什么大问题,但是考虑一下,如果你在 PYTHONPATH 下的两个目录中,有两个同名的软件包。你的子模块可能最终导入了另一个软件包,你将无意间使得某个或某些对此毫无戒备的程序员(或是你自己)debug 到深夜。

# within a sub-module
from . import FSQEnqueueError, FSQCoerceError, FSQError, FSQReenqueueError,
       constants as _c, path as fsq_path, construct,
       hosts as fsq_hosts, FSQWorkItem
from .internal import rationalize_file, wrap_io_os_err, fmt_time,
           coerce_unicode, uid_gid
# you can also use ../... etc. in sub-packages.
 

5. 让模块保持较小的规模

你的模块应当比较小。记住,那个使用你软件包的程序员会在软件包作用域进行导入,同时你会使用你的 __init__.py 文件来作为一个组织工具,来暴露一个完整的接口。

好的做法是一个模块只定义一个类,伴随一些帮助方法和工厂方法来协助建立这个模块。

class APackageClass(object):
'''One class'''
def apackage_builder(how_many):
  for i in range(how_many):
    yield APackageClass()
 

如果你的模块暴露了一些方法,把一些相互依赖的方法分为一组放进一个模块,并且把不相互依赖的方法移动到单独的模块中:

####### EXPOSED METHODS #######
def enqueue(trg_queue, item_f, *args, **kwargs):
'''Enqueue the contents of a file, or file-like object, file-descriptor or
the contents of a file at an address (e.g. '/my/file') queue with
arbitrary arguments, enqueue is to venqueue what printf is to vprintf
'''
  return venqueue(trg_queue, item_f, args, **kwargs)
def senqueue(trg_queue, item_s, *args, **kwargs):
'''Enqueue a string, or string-like object to queue with arbitrary
arguments, senqueue is to enqueue what sprintf is to printf, senqueue
is to vsenqueue what sprintf is to vsprintf.
'''
  return vsenqueue(trg_queue, item_s, args, **kwargs)
def venqueue(trg_queue, item_f, args, user=None, group=None, mode=None):
'''Enqueue the contents of a file, or file-like object, file-descriptor or
the contents of a file at an address (e.g. '/my/file') queue with
an argument list, venqueue is to enqueue what vprintf is to printf
if entropy is passed in, failure on duplicates is raised to the caller,
if entropy is not passed in, venqueue will increment entropy until it
can create the queue item.
'''
# setup defaults
  trg_fd = name = None
# ...
 

上面的例子是 fsq/enqueue.py,它暴露了一系列的方法来为同一个功能提供不同的接口(就像 simplejson 中的l oad/loads)。尽管这个例子足够直观,让你的模块保持较小规模需要一些判断,但是一个好的原则是:

当你有疑问的时候,就去创建一个新的子模块吧。


构建Python包的五个简单准则就是这样,欢迎大家参考。。。。

Python对中文字符串截取的方法介绍

Python对中文字符串截取的方法是如何来实现的呢?下面的内容将会通过具体的实例来演示Python对中文字符串截取的方法的实现方法及相关技巧:

本文实例讲述了Python实现简单截取中文字符串的方法。分享给大家供大家参考。具体如下:

web应用难免会截取字符串的需求,Python中截取英文很容易:

>>> s = 'abce'
>>> s[0:3]
'abc'
 

但是截取utf-8的中文机会截取一半导致一些不是乱码的乱码.其实utf8截取很简单,这里记下来作为备忘

#-*- coding:utf8 -*-
s = u'中文截取'
s.decode('utf8')[0:3].encode('utf8')
# 结果u'中文截取


Python对中文字符串截取的方法就是这样,欢迎大家参考。。。。

Python中datetime模块关于时间处理方法介绍

Python中datetime模块关于时间处理的方法是如何来使用的呢?下面的内容将会通过具体的实例来演示Python中datetime模块关于时间处理的方法的使用方法及相关技巧:

常用时间转换及处理函数:

import datetime
# 获取当前时间
d1 = datetime.datetime.now()
print d1
# 当前时间加上半小时
d2 = d1 + datetime.timedelta(hours=0.5)
print d2
# 格式化字符串输出
d3 = d2.strftime('%Y-%m-%d %H:%M:%S')
print d3
# 将字符串转化为时间类型
d4 = datetime.datetime.strptime(date,'%Y-%m-%d %H:%M:%S.%f')
print d4
 

获取本周和本月第一天的日期:

# -*- coding:utf-8 -*-
import datetime
def first_day_of_month():
  '''
  获取本月第一天
  :return:
  '''
  # now_date = datetime.datetime.now()
  # return (now_date + datetime.timedelta(days=-now_date.day + 1)).replace(hour=0, minute=0, second=0,
  # microsecond=0)
  return datetime.date.today() - datetime.timedelta(days=datetime.datetime.now().day - 1)
def first_day_of_week():
  '''
  获取本周第一天
  :return:
  '''
  return datetime.date.today() - datetime.timedelta(days=datetime.date.today().weekday())
if __name__ == "__main__":
  this_week = first_day_of_week()
  last_week = this_week - datetime.timedelta(days=7)
  this_month = first_day_of_month()
  last_month = this_month - datetime.timedelta(days=(this_month - datetime.timedelta(days=1)).day)
  print this_week
  print last_week
  print this_month
  print last_month
 
#! /usr/bin/python
# coding=utf-8
import datetime
"""
datetime的功能强大
能支持0001年到9999年
"""
"""
当前时间
返回的是一个datetime类型
now方法有个参数tz,设置时区类型。如果没有和方法today的效果一样
"""
now = datetime.datetime.now()
#UTC时间
datetime.datetime.utcnow()
attrs = [
("year","年"),('month',"月"),("day","日"),('hour',"小时"),( 'minute',"分"),( 'second',"秒"),( 'microsecond',"毫秒"),(
'min',"最小"),( 'max',"最大"),
]
for k,v in attrs:
  "now.%s = %s #%s" % (k,getattr(now, k),v)
"""
返回一个time结构
"""
now.timetuple()
"""
返回一个date类型
"""
now.date()
"""
返回一个time类型
"""
now.time()
"""
当前星期几。星期一是0,星期于是6
注意这里是方法,不是属性哦。
"""
now.weekday()
"""
当前星期几。星期一是1,星期于是7
注意这里是方法,不是属性哦。
"""
now.isoweekday()
"""
修改当前时间。比如修改成当月1号
"""
now.replace(day=1)
past = datetime.datetime(2010,11,12,13,14,15,16)
"""
进行比较运算
返回的是timedelta类型
"""
now-past
"""
转成字符串
详细规则见Time篇
"""
strdatetime = now.strftime("%Y-%m-%d %H:%M:%S")
"""
字符串生成datetime对象
"""
datetime.datetime.strptime(strdatetime, "%Y-%m-%d %H:%M:%S")


Python中datetime模块关于时间处理的方法就是这样,欢迎大家参考。。。。

python实现基于SSL的IRC bot实例介绍

python基于SSL的IRC bot实例是如何来实现的呢?下面的内容将会通过具体的实例来演示python基于SSL的IRC bot实例的实现方法及相关技巧:

本文实例讲述了python简单实现基于SSL的 IRC bot。分享给大家供大家参考。具体如下:

#!/usr/bin/python
# -*- coding: utf8 -*-
import socket, string, time, ssl
import urllib, re
network = 'irc.server.net'
nick = 'nickname'
chan = 'bot'
port = 6697
socket = socket.socket(socket.AF_INET,socket.SOCK_STREAM)
def main(network, nick, chan, port):
  socket.connect((network,port))
  irc = ssl.wrap_socket(socket)
  irc.send('NICK %srn' % nick)
  print irc.recv(4096)
  irc.send('USER %s %s %s :My botrn' % (nick,nick,nick))
  print irc.recv(4096)
  irc.send('JOIN #%srn' % chan)
  print irc.recv(4096)
  while True:
    data = irc.recv(4096)
    print data
    if data.find('PING') != -1:
      irc.send('PONG '+data.split()[1]+'rn')
    if data.find('!gtforn') != -1:
      irc.send('QUITrn')
      exit()
    print data
if __name__=='__main__':
  main(network, nick, chan, port)


python基于SSL的IRC bot实例就是这样,欢迎大家参考。。。。

Python中修改MP3格式文件的方法

Python中修改MP3格式文件是如何来实现的呢?下面的内容将会通过具体的实例来演示Python中修改MP3格式文件的实现方法及相关技巧:

本文实例讲述了Python修改MP3文件的方法。分享给大家供大家参考。具体如下:

用这个程序修改后的MP3比原来要小一些了,因为一张图片被删除了,起到了给MP3″瘦身”的作用。在一些mp3中,每个都有一张400多K的图片,10几个MP3,就相当一个普通MP3文件的大小了。

# -*- coding: cp936 -*-
“””
将MP3文件中的ID3V2.3部分去掉,以便在MP3机上播放
用法:mp3lcear [源mp3目录] [生成的mp3目录] “””
import sys
import os
import string
import shutil
import struct
import thread
import threading
import time
mp3suffix = ‘mp3′
class Process(threading.Thread):
“””
简单地在运行的过程中显示进度
“””
def __init__(self,msg,sleepTime):
threading.Thread.__init__(self)
self.msg = msg
self.running = True
self.sleepTime = sleepTime
def setPause(self,pause):
self.pause = pause
def setRunning(self,running):
self.running = running
def run (self):
while(self.running):
self.pause.wait()
print self.msg,
time.sleep(self.sleepTime)
def usage(code, msg=”):
“””
程序的使用方法
“””
print >> sys.stderr, __doc__
if msg:
print >> sys.stderr, msg
sys.exit(code)
def checkDir(argDir,create=False):
“””
检查目录是否存在,如果create为Ture,则新建一个目录
“””
tempDir = None
if(not os.path.isdir(argDir)):
currentDir = os.path.abspath(os.curdir)
tempDir = os.path.join(currentDir,argDir)
if(not os.path.isdir(tempDir) and create):
os.mkdir(tempDir)
else:
usage(1,”目录”+argDir+”不存在”)
else:
tempDir = os.path.abspath(argDir)
return tempDir
def clearMp3(srcFile,destFile):
“””
修改mp3文件,并将其创建到destFile所指定的地址
“””
global process
srcfp = None
filesize = os.path.getsize(srcFile)
try:
srcfp = open(srcFile,’rb’)
head = srcfp.read(3)
if(head==’ID3′):
srcfp.seek(3,1)
size = srcfp.read(4)
if(not len(size)==4):
print srcFile+’文件格式错误’
else:
size0 = struct.unpack(‘b’,size[0])[0] size1 = struct.unpack(‘b’,size[1])[0] size2 = struct.unpack(‘b’,size[2])[0] size3 = struct.unpack(‘b’,size[3])[0] headSize =(((size0&0x7f)<<21) | ((size1&0x7f)<<14) | ((size2&0x7f)<<7) | (size3&0x7f)) filesize = filesize - headSize destfp = None try: dataLen = 0 destfp = open(destFile,'wb') srcfp.seek(headSize,1) data=srcfp.read(1024) while (data!= ''): destfp.write(data) data=srcfp.read(1024) except Exception,e: print '创建文件'+destFile+'错误',e try: if (destfp != None): destfp.close except Exception,de: print de else: print srcFile+'不需要修改 拷贝', try: shutil.copyfile(srcFile,destFile) except Exception, ce: print ce except Exception,oe: print '修改中出错',oe try: if (srcfp != None): srcfp.close() except Exception,se: print de if __name__ == "__main__": if(len(sys.argv)<3): usage(1) global process sourceDir = checkDir(sys.argv[1]) destDir = checkDir(sys.argv[2],True) print 'Mp3源目录',sourceDir print 'Mp3目的目录',destDir process = Process('...',1) pause = threading.Event() process.setPause(pause) process.start() for filename in os.listdir(sourceDir): srcPath = os.path.join(sourceDir, filename) destPath = os.path.join(destDir, filename) if os.path.isfile(srcPath): print '开始处理 '+filename, tempfilename = filename.lower() if(not tempfilename.endswith(mp3suffix)): print filename+'不是一个mp3文件n' else: pause.set() clearMp3(srcPath,destPath) pause.clear() print '结束 n' pause.set() process.running = False sys.exit(0) [/code]
Python中修改MP3格式文件就是这样,欢迎大家参考。。。。

Python中下载股市信息的方法

Python中下载股市信息是如何来实现的呢?下面的内容将会通过具体的实例来演示Python中下载股市信息的实现方法及相关技巧:

本文实例讲述了Python实现股市信息下载的方法。分享给大家供大家参考。具体如下:

该程序下载来自yahoo财经的股市信息。

import urllib
def getURL(url):
  socket = urllib.urlopen(url)
  readSocket = socket.read()
  socket.close()
  return readSocket
def printInfo(listInfo):
  print "Stock Symbol: " , listInfo[0]
  print "Last Trade Price: " , listInfo[1]
  print "Last Trade Date: " , listInfo[2]
  print "Last Trade Time: " , listInfo[3]
  print "Change: " , listInfo[4]
  print "Open: " , listInfo[5]
  print "Day's High: " , listInfo[6]
  print "Day's Low: " , listInfo[7]
  print "Volume: " , listInfo[8]
stockSymbol = raw_input("Enter the stock symbol: ")
stockURL = "http://download.finance.yahoo.com/d/quotes.csv&#63;s=%s&f;=sl1d1t1c1ohgv&e;=.csv" % stockSymbol
stockInfoStr = getURL(stockURL)
stockInfoStr = stockInfoStr.rstrip()
stockInfoStr = stockInfoStr.split(",")
printInfo(stockInfoStr)


Python中下载股市信息就是这样,欢迎大家参考。。。。

Python中关于栈的类的分析

Python中关于栈的类是如何来使用的呢?下面的内容将会通过具体的实例来演示Python中关于栈的类的使用方法及相关技巧:

本文实例讲述了python栈类。分享给大家供大家参考。具体如下:

class Path: #a list used like a stack
    def __init__(self):
        self.P = []
    def push(self,t):
        self.P.append(t)
    def pop(self):
        return self.P.pop()
    def top(self):
        return self.P[-1]
    def remove(self):
        self.P.pop(0)
    def isEmpty(self):
        return (len(self.P)==0)
    def printPath(self):
        print self.P


Python中关于栈的类就是这样,欢迎大家参考。。。。

Python中计算三维矢量幅度的方法

Python中计算三维矢量幅度是如何来实现的呢?下面的内容将会通过具体的实例来演示Python中计算三维矢量幅度的实现方法及相关技巧:

本文实例讲述了Python计算三维矢量幅度的方法。分享给大家供大家参考。具体如下:

from numpy import *
from math import *
a=(['x','y','z'])
sum_com=0
for i in range(3):
  y=input("Enter %s component:"%a[i])
  m=y**2
  sum_com += m
magnitude=sqrt(sum_com)
print "The magnitude of vector is %s"%magnitude


Python中计算三维矢量幅度就是这样,欢迎大家参考。。。。

Python中素数检测的方法

Python中素数检测是如何来实现的呢?下面的内容将会通过具体的实例来演示Python中素数检测的实现方法及相关技巧:

本文实例讲述了Python素数检测的方法。分享给大家供大家参考。具体如下:

该程序实现了素数检测器功能,如果结果是true,则是素数,如果结果是false,则不是素数。

def fnPrime(n):
  for i in range(2,n,1):
    if(n % i == 0):
      return bool(0)
  return bool(1)


Python中素数检测就是这样,欢迎大家参考。。。。

Python中统计文件字数的方法

Python中统计文件字数是如何来实现的呢?下面的内容将会通过具体的实例来演示Python中统计文件字数的实现方法及相关技巧:

本文实例讲述了Python计算一个文件里字数的方法。分享给大家供大家参考。具体如下:

这段程序从所给文件中找出字数来。

from string import *
def countWords(s):
  words=split(s)
  return len(words)
  #returns the number of words
filename=open("welcome.txt",'r')
#open an file in reading mode
total_words=0
for line in filename:
  total_words=total_words + countWords(line)
  #counts the total words
print total_words


Python中统计文件字数就是这样,欢迎大家参考。。。。

Python判断Abundant Number的方法

Python判断Abundant Number的方法是如何来实现的呢?下面的内容将会通过具体的实例来演示Python判断Abundant Number的方法的实现方法及相关技巧:

本文实例讲述了Python判断Abundant Number的方法。分享给大家供大家参考。具体如下:

Abundant Number,中文译成:盈数(又称 丰数, 过剩数abundant number)是一种特殊的 自然数,除去它本身以外的一切正约数的和大于它本身。

介绍见百度百科: http://baike.baidu.com/view/1596350.htm

#Checks if a number is abundant or not
#An abundant number is the number of which sum of
#factors(including itself) is greater than twice the number
def abundant(n):
  sum_factors=0
  for i in range(1,n+1):
    if n%i==0:
    #finds out the factors
      f=i
      sum_factors += f
  if sum_factors>2*n:
  #condition for abundant number
    print "This is an Abundant Number!"
  else:
    print "This is not an Abundant Number!"


Python判断Abundant Number的方法就是这样,欢迎大家参考。。。。